
lunes, noviembre 19, 2012

Improving Readability of Your Conditional Expressions with Bool

Introduction

Bool is a project that uses Hamcrest matchers to provide a clean way to write conditionals and making them readable even for your clients.
Note that apart from cleaning your code, it forces you to maintain the level of abstraction of methods without having to populate your classes with a list of methods that are composed by one line returning a boolean value like next example:
...
if(areResultsAvailable(messages)) {
...
}

private boolean areResultsAvailable(List<String> messages) {
    return messages.size()>0;
}

From Hamcrest documentation we can read that:
Hamcrest it is not a testing library: it just happens that matchers are very useful for testing.
Hamcrest is used in many projects, JUnit for asserting tests (most of us have use it in this way), or Mockito. But as previous cite said,Hamcrest can be also used outside testing scope, Lambdaj is an example, and Bool is another one.

Installation

To use Bool you only have to add it to classpath.
<dependency>
    <groupId>com.lordofthejars</groupId>
    <artifactId>bool</artifactId>
    <version>0.9.0</version>
</dependency>

In Action

All required methods are provided as static methods in the class Bool:
import static com.lordofthejars.bool.Bool.*;
Let's explore a simple example to see the differences between using an if as usually and with Bool project:
String name = "Alex";

if(isAlex(name) {
...
}

private boolean isAlex(String name) {
    return "Alex".equals(name);
}
you can use Hamcrest directly in condition without using Bool, but see that readability is not improved:
import static org.hamcrest.CoreMatchers.equalTo;

if(equalTo("Alex").matches(name)) {
...
}
and finally using Bool:
if(the(name, is(equalTo("Alex")))) {
...
}
Note that the important word here is the, which receives the element to compare and a matcher (similar to assertThat method). See in previous example how condition has been improved so much.
Another place where Bool improves readability is with not operator (!).
If you want to return if name is not Alex, you should add a new method with ! operator which does not help us too much in improving the code legibility.
if(isNotAlex(name) {
...
}

private boolean isAlex(String name) {
    return "Alex".equals(name);
}

private boolean isNotAlex(String name) {
    return !isAlex(name)
}
But with Bool:
if(the(name, is(not(equalTo("Alex"))))) {
...
}
Bool is also useful when you are dealing with collections. Because you can use any matcher from Hamcrest project you can implement conditions that would require some work if you didn't use Bool, in a few seconds; see next example:
List ages = Arrays.asList(21, 25, 30);

if(areAllPersonsAdult(ages)) {
...
}

private boolean areAllPersonsAdult(List<Integer> ages) {

    for(int age:ages) {
        if(age < 18) {
            return false;
        }
    }

return true;

}
To something like:
List ages = Arrays.asList(21, 25, 30);

if(the(ages, is(everyItem(greaterThan(18))))) {
..
}
But also with arrays are improved so much, when you want to compare two arrays you cannot do by using equals method directly but using Arrays.equals method. But Hamcrest matchers deals with this problem, hiding this details from developers so we can compare arrays safely.
byte[] name = "alex".getBytes();

if(the(name, is(equalTo("Alex".getBytes())))) {
...
}
And of course you can use all matchers you can imagine like containsemptycontainsInAnyOrder, ...
Let's complicate things a bit more.
Normally, our conditions contain more than one clause. For example, the name should be "Alex" or "Ada"

For covering this case, be and is keyword is also available. is keyword provides a better readability to your conditions, but can conflict with Hamcrest "is" method. So be is also provided. You can use any of them.
if(the(name, be(equalTo("Alex")).or(be(equalTo("Ada"))))) {
...
}
and is also valid, but remember that the is method is from Bool class not the Hamcrest one.
if(the(name, is(equalTo("Alex")).or(is(equalTo("Ada"))))) {
...
}
be matcher also contains and operation too.
But sometimes rules are more complex and imply more than one variable. For solving this cases, we must use twice the the keyword. So for example if name should be "Alex" and surname "Soto":
String name = "Alex";String surname = "Soto";

if(the(name, be(equalTo("Alex")).and(the(surname, equalTo("Soto"))))) {...}
Note that be keyword is only mandatory when we want to concatenate conditions.
As final notes, you can even use matchers defined in Lambdaj project, and a pretty example could be to compare a property of a class:
private class Person {

        private String name;

        public Person(String name) {
            this.name = name;
        }

        public void setName(String name) {
            this.name = name;
        }

        public String getName() {
            return name;
        }
}

if(the(person, having(on(Person.class).getName(), is(equalTo("Alex"))))) {
...
}
And also you can use Bool in unit tests by using shouldBe method. For example a valid assertion could be:
assertThat(the(name, shouldBe(equalTo("Alex")).and(shouldBe(startsWith("A")))), is(true));

Performance

It seems reasonable that using Bool performance should be worst than using native conditions. But I have to say that I have been pleasantly surprised by the performance of Bool and Hamcrest matchers.
I have run 5000 times some examples provided in documentation. For example one single condition, one condition negated, two conditions over the same attribute with and keyword, two attributes being compared with one condition, and finally one collection comparison. And the results are the next ones:
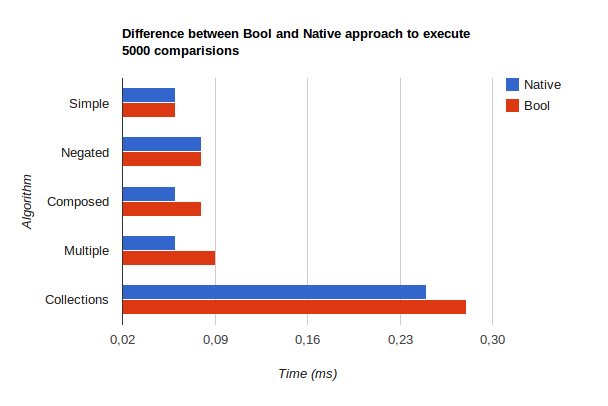
Performance
Note that using simple conditions the time is the same, and is after we start creating more complex condition expressions that the performance is a bit reduced.
You can find the performance test in com.lordofthejars.bool.performance.PerformanceTests

Final Notes

Please keep in mind that the border between writing clean and readable code and something unintelligible is very thin. You can start creating a complex chaining of calls, train wreck, so no one can understand the real meaning of the condition. 

One good practice to avoid this case is splitting complex chaining calls into multiple variables and then the final calls are executed inside the if (or inside a method which extracts all this logic). But anyway if you found creating a really complex condition, think about the correctness of this logic before coding it, because maybe you are providing to a condition a heavy responsibility.
Also note that you can use Bool in all of your conditions, but where you really take the full power is in  conditions that represents important rules for your business.

Stay In Touch

And any suggestion, improve, or bug don't hesitate to open an issue.

E il Tacchino GluGluGlu, E il Gallo CoroCoco, E la Gallina Coo, E il Pulcino Pio (Il Pilcino Pio - I Blogger)
Music: http://www.youtube.com/watch?v=YNwjkEdBpOk

lunes, noviembre 05, 2012

Meet Me at Devoxx 2012


Next week starts the Devoxx. I will be there as speaker and as listener. You can meet me on two presentations (a Tools in Action and a BOF ones).


In Tools In Action I will introduce you NoSQLUnit, a JUnit extension for writing tests for NoSQL applications.

This will be on Monday 12th at 16:45.


Don't miss it if you are planning to use NoSQL systems as backend in your applications.


In the BOF, Bartosz Majsak, John Ferguson Smart, Paul Bakker, Dan Allen, Aslak Knutsen, Sarah White, Mircea Markus, Lukáš Fryč, David Blevins and Me, are going to talk about killing bugs.

This will be on Monday 12th at 21:00.


Don't miss it for anything else in the world.


Hope to see all of you there.
Alex.
And through it all she offers me protection, A lot of love and affection, Whether I'm right or wrong (Angel - Robbie Williams)


jueves, noviembre 01, 2012

NoSQLUnit 0.6.0 Released


NoSQLUnit is a JUnit extension to make writing unit and integration tests of systems that use NoSQL backend easier. Visit official page for more information.

In 0.6.0 release, one new NoSQL system is supported and is HBase.

Apache HBase is an open-source, distributed, versioned, column-oriented store.

As all databases supported by NoSQLUnit, two set of rules are provided to write HBase tests:

First set of JUnit Rules are those responsible of managing database lifecycle; basically starting and stopping HBase instance.
  • Embedded: com.lordofthejars.nosqlunit.hbase.EmbeddedHBase
  • Managed: com.lordofthejars.nosqlunit.hbase.ManagedHBase
Depending on the kind of tests you are implementing (unit test, integration test, deployment tests, …) you will require an embedded, managed or remote approach. Note that for now I haven't implemented an In-Memory approach because there is no in-memory HBase  instance, but embedded strategy for unit tests will be the better one. 

Second set of rules are those responsible of maintaining database into known state;
  • NoSQLUnit Management: com.lordofthejars.nosqlunit.hbase.HBaseRule
And finally default dataset file format in HBase is json. Dataset in HBase is the same used by Cassandra-Unit but not all fields are supported. Only fields available in TSV HBase application can be set into dataset.

We will use a very simple example used in HBase tutorial as an example of how to write unit tests for systems that uses HBase database as backend.

First of all, dataset used to maintain HBase into known state:


and finally the test case:


Stay in touch with the project and of course I am opened to any ideas that you think that could make NoSQLUnit better.
We de ze zu bu, We de sooo a ru, Un va-a pesh a lay, Un vi-I bee (Now We Are Free - Lisa Gerrard)
Music: http://www.youtube.com/watch?v=ObGYFInWrU0

domingo, octubre 14, 2012

NoSQLUnit 0.5.0 released


NoSQLUnit is a JUnit extension to make writing unit and high-level tests of systems that use NoSQL as backend easier. Visit official page for more information.

In current release instead of supporting one new engine, I focused on implementing an embedded in-memory Redis engine based on Jedis.  Read in documentation the limitations on current implementation. And of course now NoSQLUnit also supports embedded Redis apart from Managed and Remote, you only have to register EmbeddedRedis rule to use it.
@ClassRule
public static EmbeddedRedis embeddedRedis = newEmbeddedRedisRule().build();
Moreover I have fixed some issues with Managed Cassandra lifecycle.

Also I have extended the support to embedded Neo4j engine by allowing the use of instance defined into Spring context file using spring data namespace. See next example that NoSQLUnit will populate data into instance defined in application context.
<?xml version="1.0" encoding="UTF-8" standalone="yes"?>
<beans xmlns="http://www.springframework.org/schema/beans"
        xmlns:context="http://www.springframework.org/schema/context"
        xmlns:xsi="http://www.w3.org/2001/XMLSchema-instance"
        xmlns:neo4j="http://www.springframework.org/schema/data/neo4j"
        xsi:schemaLocation="
            http://www.springframework.org/schema/beans
            http://www.springframework.org/schema/beans/spring-beans-3.0.xsd
            http://www.springframework.org/schema/context
            http://www.springframework.org/schema/context/spring-context-3.0.xsd
            http://www.springframework.org/schema/data/neo4j
            http://www.springframework.org/schema/data/neo4j/spring-neo4j-2.0.xsd">

    <context:annotation-config/>
    <neo4j:config storeDirectory="target/config-test"/>

</beans>
And in your test you only have to define SpringEmbeddedNeo4j rule passing the application context object where Neo4j is defined.
@Autowired
private ApplicationContext applicationContext;
...
@ClassRule
SpringEmbeddedNeo4j springEmbeddedGds = newSpringEmbeddedNeo4jRule().beanFactory(applicationContext).build();
And finally in this version of NoSQLUnit, I have implemented that we can use Shard connections provided by Jedis library to populate defined data into different shards. The only thing you should do is changing configuration instance of RedisRule to ShardedRedisConfiguration. See next simple example:
@Rule
public RedisRule redisRule = new RedisRule(newShardedRedisConfiguration()
         .shard(host("127.0.0.1"), port(ManagedRedis.DEFAULT_PORT))
             .password("a")
             .timeout(1000)
             .weight(1000)
         .shard(host("127.0.0.1"), port(ManagedRedis.DEFAULT_PORT + 1))
             .password("b")
             .timeout(3000)
             .weight(3000)
         .build());

And that's all for current version.

Next release 0.6.0 will contain support for HBase. Moreover there are an open poll to vote which engine would you like to see in next releases:


Stay in touch with the project and of course I am opened to any ideas that you think that could make NoSQLUnit better.

We keep learning,
Alex.

Well, these boots are made for walking, and that's just what they'll do, One of these days these boots are gonna walk all over you. (These Boots Are Made For Walkin' - Nancy Sinatra)
Music: http://www.youtube.com/watch?v=SbyAZQ45uww

miércoles, octubre 10, 2012

Installing And Running Hubot, Terminator is Here


In current post we are going to see how to install hubot and make it work over XMPP protocol (using open fire server),  and how can help us during our daily work.

Hubot is a robot which belongs to your chat infrastructure as one more user, which you can talk with him. Hubot can help you automate a lot of tasks, like deploy a site, manage your Pomodoro,   or managing issue system to cite a few of them. Hubot is written in CoffeScript on Node.js, keep in mind that Hubot can be extended with CoffeScript and you can easily extend it.

This post is written using Ubuntu, so if you are using any other OS, you only have to modify the way of how components are installed.

First of all (I assume you have a JVM installed), you must install npm and node.js. For this I have used apt-get.
sudo apt-get install nodejs npm
Next step is installing Hubot dependencies by running next apt-get command.
apt-get install build-essential libssl-dev git-core redis-server libexpat1-dev
Then we need to install CoffeScript. So we can run next command:
npm install -g coffee-script
And finally we are going to install Hubot in /opt directory. Obviously could be any other one.
cd /opt
git clone git://github.com/github/hubot.git && cd hubot
npm install
Hubot is installed, to see if it works simply run from installation directory:
alex@grumpy:/opt/hubot$ ./bin/hubot
and Hubot shell will be started. This shell is really useful for testing purposes but not for production environment.
Hubot> hubot ping
Hubot> PONG
which will produce a Pong message.

Now it is time to install Openfire server so we can communicate with Hubot using XMPP protocol instead of shell. Of course you could choose any other XMPP server, but for now Openfire is used.

To install it, download it from openfire site, and extract it to /opt directory.
tar -xzvf openfire_<version>.tar.gz
mv openfire /opt
Then it is time to configure Openfire server, we are going to use embedded database but of course you can configure an external database such as MySQL or Oracle.

A web-based wizard driven setup and configuration tool is built in Openfire, so let's start Openfire server for the first time and configure typical parameters like administrator username, server name, ...
$OPENFIRE_HOME/bin/openfire start
and access to http://localhost:9090.

Then log in as admin into Openfire and create first two users, developer and hubot. So go to Users/Groups -> Create New User, and fill required information for both users.


Next step is creating a room where all users that want to interact with Hubot will join. So go to Group Chat -> Create New Room and create a new room. In our case we are going to call hubot.


and finally we must disable TLS security, there is an issue between Openfire TLS version and node.js XMPP module so if you are using Openfire, you should disable it.


Next step is checking that developer user has access to hubot chatroom and the account is correctly configured, so we can open our XMPP client (in our case Spark) but should be work with any other one and verify that we can connect.

If you are using Spark, log in with developer account and in Actions menu you will find Join Conference room option. Setthere and choose previously created room (hubot). And now you know you have configured correctly XMPP part.

And now it is time for Hubot. First of all we are going to create a bot called my-bot:
alex@grumpy:/opt/hubot$ ./bin/hubot -c ./my-bot
Then enter into my-bot directory and open package.json and add next dependencies which configure  adapter so Hubot can use XMPP protocol for communication:
"dependencies": {
    "hubot": "2.3.2",
    "hubot-scripts": ">= 2.1.0",
    "optparse": "1.0.3",
    "node-xmpp": "0.3.2",
    "hubot-xmpp": "0.1.0",
    "htmlparser": "1.7.6",
    "soupselect": "0.2.0",
    "underscore": "1.3.3",
    "underscore.string": "2.2.0rc"
  }
Then before starting Hubot, you must install XMPP adapter. Run from hubot directory npm install, and XMPP extension will be installed into hubot.
alex@grumpy:/opt/hubot/my-bot$ npm install
And now we are ready to start using Hubot and Openfire.

We are going to start by adding environment variables to configure XMPP adapter.
export HUBOT_XMPP_USERNAME=hubot@grumpy
export HUBOT_XMPP_PASSWORD=<password>
export HUBOT_XMPP_ROOMS=hubot
Note that username should be accompanied for server name which in my case is grumpy. And finally it is time to start Hubot.
alex@grumpy:/opt/hubot/my-bot$ ./bin/hubot --adapter xmpp
And you will see at Spark your new friend (if you have already add hubot as a friend).


And after you check that we can go to hubot-scripts and download and install the useful ones depending on our environment.

In next video you could see a screencast of Hubot In Action with some scripts that I use.


I wish you have liked Hubot,

We keep learning,
Alex.


A Time For Us, At Last To See, A Life Worthwhile, For You And Me (A Time For Us - Andy Williams)
Music: http://www.youtube.com/watch?v=sRnx-s1TQbU

lunes, septiembre 24, 2012

Testing client side of RESTful services


People tell me A and B, They tell me how I have to see, Things that I have seen already clear, So they push me then from side to side (I Want Out - Helloween)
Develop an application that uses RESTful web API may imply developing server and client side. Writing integration tests for server side can be as easy as using Arquillian to start up server and REST-assured to test that the services works as expected. The problem is how to test the client side. In this post we are going to see how to test the client side apart from using mocks.

As a brief description, to test client part, what we need is a local server which can return recorded JSON responses. The rest-client-driver is a library which simulates a RESTful service. You can set expectations on the HTTP requests you want to receive during a test. So it is exactly what we need for our java client side. Note that this project is really helpful to write tests when we are developing RESTful web clients for connecting to services developed by third parties like Flickr Rest API, Jira Rest API, Github ...

First thing to do is adding rest-client-driver dependency:

Next step we are going to create a very simple Jersey application which simply invokes a get method to required URI.

And now we want to test that invokeGetMethod really gets the required resource. Let's suppose that this method in production code will be responsible of getting all issues name from a project registered on github.

Now we can start to write the test:

  • We use ClientDriverRule  @Rule annotation to add the client-driver to a test.
  • And then using methods provided by RestClientDriver class, expectations are recorded.
  • See how we are setting the base URL using driver.getBaseUrl()
With rest-client-driver we can also record http status response using giveEmptyResponse method:


And obviously we can record a put action:

Note that in this example, we are setting that our request should contain given message body to response a 204 status code.

This is a very simple example, but keep in mind that also works with libraries like gson or jackson. Also rest-driver project comes with a module that can be used to assert server responses (like REST-assured project) but this topic will be addressed into another post.

I wish you have found this post useful.

We keep learning,
Alex.

miércoles, septiembre 05, 2012

NoSQLUnit 0.4.1 Released


Yo no soy marinero, Yo no soy marinero, soy capitan, Soy capitan, soy capitan, Bamba, bamba (La Bamba - Ritchie Valens)
NoSQLUnit is a JUnit extension to make writing unit and integration tests of systems that use NoSQL backend easier. Visit official page for more information.

In 0.4.1 release, after supporting Cassandra in 0.4.0 version, one new NoSQL system is supported and is Redis.

Redis is an open source, advanced key-value store. It is often referred to as a data structure server since keys can contain strings, hashes, lists, sets and sorted sets.

As all databases supported by NoSQLUnit, two set of rules are provided to write Redis tests:

First set of JUnit Rules are those responsible of managing database lifecycle; basically starting and stopping Redis instance.

  • Currently Redis does not support embedded lifecycle. For this reason I am developing an embedded in-memory Redis mock. It is based in Jedis library, and will be released in next version. Issue #22.
  • Managed: com.lordofthejars.nosqlunit.redis.ManagedRedis
Second set of rules are those responsible of maintaining database into known state;
  • NoSQLUnit Management: com.lordofthejars.nosqlunit.redis.RedisRule
And finally default dataset file format in Redis is json

We will use a very simple example used in Redis tutorial as an example of how to write unit tests for systems that uses Redis database as backend.

First of all, dataset used to maintain Redis into known state:


and finally the test case:


Next release 0.4.2 will contain fixes for issues #22, #23, #24 and #25. Moreover there are an open a poll to vote which engine would you like to see in 0.5.0 release:

Vote For Next Engine

Stay in touch with the project and of course I am opened to any ideas that you think that could make NoSQLUnit better.

Music: http://www.youtube.com/watch?v=Jp6j5HJ-Cok

martes, septiembre 04, 2012

Deploying JEE Artifacts with Jenkins


Un mondo, Soltanto adesso, io ti guardo, Nel tuo silenzio io mi perdo, E sono niente accanto a te (Il Mondo - Jimmy Fontana)
With the advent of Continuous Integration and Continuous Delivery, our builds are split into different steps creating the deployment pipeline. Some of these steps can be for example compile and run fast tests, run slow tests, run automated acceptance tests, or releasing the application, to cite a few.


The final steps of our deployment pipeline, implies a deployment of our product (in case of JEE project a war or ear) to production-like environment, for UAT or to production system when product is released.

In this post we are going to see how we can configure Jenkins to manage the deployment of a Java Enterprise Application correctly.

First thing to do is creating  the application, in this case a very simple web application in Java (in fact is only one jsp which prints a Hello World!! message) and mavenize it to create a war file (bar.war) when package goal is executed.

Then we need to create a Jenkins job (called bar-web) which is the responsible of compiling, and running unit tests. 

After this job would  come other jobs like running integration tests, running more tests, static code analysis (aka code quality), or uploading artifacts to  artifacts repository but won't be shown here.

And finally, the last steps which imply deploying previous generated code to staging environment (for running User Acceptance Tests for example) and after key users give the ok, deploying to production environment.

So let's see how to create these final steps in Jenkins. Note that binary file created in previous steps  (bar-web in our case) must be used in all these steps. This is because of two reasons, the first one is that your deployment pipeline should be run as fast as possible and obviously compiling in each step the code is not the best way to get it, the second one is that each time you compile your sources, increases the chance of not being compiling sources of previous steps. To achieve this goal we can follow two strategies, the first one is uploading binary files to artifact repository (like Nexus or Artifactory) and get from there in each job. The second one is using copy-artifacts Jenkins plugin to get binary files generated by previous step.

Let's see how to configure Jenkins for the first approach.

Using artifact repository approach, requires that you download the version we want to deploy from repository and then deploy it to external environment; in our case deploying to a web server.  All these steps are done by using maven-cargo-plugin.

Then we only have to create a new Jenkins job, named bar-to-staging, which will run cargo:redeploy Maven goal, and Cargo plugin will be the responsible to deploy bar-web to web server.

This approach has one advantage and one disadvantage.  The main advantage is that you are not bound to Jenkins, you can use Maven alone, or any other CI that supports Maven. The main disadvantage is that relies on artefacts repository, and this plan a new problem, deployment pipeline involves many steps, and between these steps (normally if you are building a snapshot version), a new artefact could be uploaded to artefacts repository with same version, and use it in the middle of pipeline execution. Of course this scenario can be avoided by managing permissions in artefact repository. 

The other approach is use Jenkins plugin, called copy-artifact-plugin. In this case Jenkins acts as an artefact repository, so artifacts created in previous step are used in next step without involving any external repository. Using this approach we cannot use maven-cargo-plugin, but we can use deploy- jenkins-plugin in conjunction with copy-artifacts-plugin

So let's see how to implement this approach.


First thing is create a Jenkins build job (bar-web), which creates the war file. Note that two Post-build actions are defined, first one is Archive the artifacts, which is used to store generated files so copy artifacts plugin can copy them to another workspace.  The other one is Build other projects, which in this case, calls a job which is responsible of deploying war file to staging directory (bar deploy-to-staging).

Next thing is create bar deploy-to-staging build job, which main action is deploying war file generated by previous build job to Tomcat server.


For this second build job, you should configure Copy artifacts plugin to copy previous generated files to current workspace, so in Build section, in Copy artifacts from another project section, we set from which build job we want to copy the artifact (in our case bar-web) and which artifacts we want to copy. And finally in Post-build actions section, we must configure which file should be deployed to Tomcat (bar.web), remember that this file is the compiled and packaged by previous build jobs, and finally set Tomcat parameters. And execution pipeline looks something like:


Note that a third build job has been added which deploys war file to production server.

This second approach is the counter part of the first approach, you can be sure that the artefact used in previous step of pipeline will be the one used in all steps, but you are bounded to Jenkins/Hudson.

So if you are going to create a policy in your artefact repository so only pipeline executor can upload artefacts to repository, first approach is better, but if you are not using an external artefact repository (you use Jenkins as is) then second approach is the best one to assure that packaged artefact in previous steps are not modified by parallel steps.

After file is deployed to server, acceptance tests or UAT tests can be executed without any problem.

I wish that now we can address the final steps of our deployment pipeline in a secure and better way.

We keep learning,
Alex.


miércoles, agosto 22, 2012

NoSQLUnit 0.4.0 Released


All across the nation such a strange vibration, People in motion, There's a whole generation with a new explanation, People in motion people in motion (San Francisco - Scott McKenzie)
NoSQLUnit is a JUnit extension to make writing unit and integration tests of systems that use NoSQL backend easier. Visit official page for more information.

In 0.4.0 release, one new NoSQL system is supported and is Cassandra.

Cassandra is a BigTable data model running on an Amazon Dynamo-like infrastructure.

As all databases supported by NoSQLUnit, two set of rules are provided to write Cassandra tests:

First set of JUnit Rules are those responsible of managing database lifecycle; basically starting and stopping Cassandra instance.
  • Embedded: com.lordofthejars.nosqlunit.cassandra.EmbeddedCassandra
  • Managed: com.lordofthejars.nosqlunit.cassandra.ManagedCassandra
Depending on kind of tests you are implementing (unit test, integration test, deployment tests, …) you will require an embedded, managed or remote approach. Note that for now I haven to implemented an In-Memory approach because there is no in-memory Cassandra  instance, but embedded strategy for unit tests will be the better one. 

Second set of rules are those responsible of maintaining database into known state;
  • NoSQLUnit Management: com.lordofthejars.nosqlunit.cassandra.CassandraRule
And finally default dataset file format in Cassandra is json. To make compatible NoSQLUnit with Cassandra-Unit file format, DataLoader of Cassandra-Unit project is used, so same json format file is used.

We will use a very simple example used in Cassandra tutorial as an example of how to write unit tests for systems that uses Cassandra database as backend.

First of all, dataset used to maintain Cassandra into known state:


and finally the test case:


Next release 0.4.1 will contain some internal changes, but no support for new engine. And after these changes, new engines will be supported. Moreover I have decided to open a poll to vote which engine would you like to see in 0.4.2 release:

Visit Poll Here

Stay in touch with the project and of course I am opened to any ideas that you think that could make NoSQLUnit better.

Music: http://www.youtube.com/watch?v=bch1_Ep5M1s

martes, agosto 07, 2012

NoSQLUnit 0.3.2 Released


Yo no te pido la luna, tan solo quiero amarte. Quiero ser esa locura que vibra muy dentro de tí (Yo No Te Pido La Luna - Sergio Dalma)

Update: 0.3.3 version has been released providing In-Memory Neo4j lifecycle support.

NoSQLUnit is a JUnit extension to make writing unit and integration tests of systems that use NoSQL backend easier. Visit official page for more information.

In 0.3.2 release, one new NoSQL system is supported and is Neo4j.

Neo4j is a high-performance, NoSQL graph database with all the features of a mature and robust database.

As all databases supported by NoSQLUnit, two set of rules are provided to write Neo4j tests:

First set of JUnit Rules are those responsible of managing database lifecycle; basically starting and stopping Neo4j.
  • Embedded: com.lordofthejars.nosqlunit.neo4j.EmbeddedNeo4j
  • Managed Wrapping: com.lordofthejars.nosqlunit.neo4j.ManagedWrappingNeoServer
  • Managed: com.lordofthejars.nosqlunit.neo4j.ManagedNeoServer
Depending on kind of test you are implementing (unit test, integration test, deployment test, ...) you will require an embedded approach, managed approach or  remote approach. Note that for now I have not implementated of a Neo4j in-memory database at this time (0.3.3 will do), but embedded strategy for unit tests will be the better one. As Neo4j developers will know, you can start remote Neo4j server by calling start/stop scripts (Managed way) or by using an embedded database wrapper by a server (Managed Wrapping way), both of them are supported by NoSQLUnit.

Second set of rules are those responsible of maintaining database into known state;
  • NoSQLUnit Management: com.lordofthejars.nosqlunit.neo4j.Neo4jRule
And finally default dataset file format in Neo4j is GraphML. GraphML is a comprehensive and easy-to-use file format for graphs.


We will use the example of finding Neo's friends as an example of how to write unit tests for systems that uses Neo4j databases as backend.

First of all dataset used to maintain Neo4j into known state:


and finally the test case:

Next release will support Cassandra. Stay in touch with the project and of course I am opened to any ideas that you think that could make NoSQLUnit better.

lunes, agosto 06, 2012

JaCoCo Jenkins Plugin


Hier soir deux inconnus, Et ce matin, sur l'avenue - Deux amoureux, tout etourdis , Par la longue nuit (Aux Champs Elysées - Joe Dassin)
In my post about JaCoCo I wrote about the problems of using JaCoCo Maven plugin in multimodule Maven project because of having one report for each module separately instead of one report for all modules, and how can be fixed it using JaCoCo Ant Task.

In current post we are going to see how to use Jacoco Jenkins plugin to achieve the same goal of Ant Task and have an overall code coverage statistic of all modules.

First step is installing JaCoCo Jenkins plugin.

Go to Go to Jenkins -> Manage Jenkins -> Plugin Manager -> Available and find for JaCoCo Plugin

Next step, if it is not done before, is configuring your JaCoCo Maven plugin into parent pom:


And finally a post-action must be configured to the job responsible of packaging the application. Note that in previous pom file reports are generated just before package goal is executed.

Go to Configure -> Post-build Actions -> Add post-build action -> Record JaCoCo coverage report.

Then we have to set folders or files containing JaCoCo XML reports, which using previous pom is **/target/site/jacoco/jacoco*.xml, and also set when we consider that a build is healthy in terms of coverage.


Then we can save the job configuration and run build project.

After project is build, a new report will appear just under test result trend graph, called code coverage trend, where we can see the code coverage of all project modules.


From left menu, you can enter to Coverage Report and watch code coverage of each module separately.


Furthermore visiting Jenkins main page a nice quick overview of a job when mouse is over the weather icon is shown:


Keep in mind that this approach for merging code coverage files will only work if you are using Jenkins as a CI system meanwhile Ant Task is more generic solution and can also be used with JaCoCo Jenkins plugin.

We Keep Learning,
Alex.

Music: http://www.youtube.com/watch?v=OAMuNfs89yE


miércoles, agosto 01, 2012

Build Flow Jenkins Plugin


Este samba, Que é misto de maracatú, É samba de preto velho, Samba de preto tu (Mais que Nada - Sergio Mendes)
With the advent of Continuous Integration and Continuous Delivery, our builds are split into different steps creating the deployment pipeline. Some of these steps can be for example compile and run fast tests, run slow tests, run automated acceptance tests, or releasing the application, to cite a few.

Most of us we are using Jenkins/Hudson to implement Continuous Integration/Delivery, and we manage job orchestration combining some Jenkins plugins like build pipeline, parameterized-build, join or downstream-ext. We require configuring all of them which implies polluting the job configuration through multiple jobs, which takes the system configuration very complex to maintain.

Build Flow enables us to define an upper level flow item to manage job orchestration and link up rules, using a dedicated DSL.

Let's see a very simple example:

First step is installing the plugin.

Go to Jenkins -> Manage Jenkins -> Plugin Manager -> Available and find for CloudBees Build Flow plugin.


Then you can go to Jenkins -> New Job and you will see a new kind of job called Build Flow. In this example we are going to name it build-all-yy.


And now you only have to program using flow DSL how this job should orchestrate the other jobs.

In "Define build flow using flow DSL" input text you can specify the sequence of commands to execute.


In current example I have already created two jobs, one executing clean compile goal (yy-compile job name) and the other one executing javadoc goal (yy-javadoc job name). I know that this deployment pipeline is not real in a true environment but for now it is enough. 

Then we want javadoc job running after project is compiled.

To configure this we don't have to create any upstream or downstream actions, simply add next lines at DSL text area:

build("yy-compile");
build("yy-javadoc");

Save and execute build-all-yy job and both projects will be built in a sequential way.

Now suppose that we add a third job called yy-sonar which runs sonar goal that generates code quality sonar report. In this case it seems obvious that after project is compiled, generation of javadocs and code quality jobs can be run in parallel. So script is changed to:

build("yy-compile")
parallel (
    {build("yy-javadoc")},
    {build("yy-sonar")}
)


This plugin also supports more operations like retry (similar behaviour of retry-failed-job plugin) or guard-rescue, that it works mostly like a try+finally block. Also you can create parameterized builds, accessing to build execution or printing to Jenkins console. Next example will print build number of yy-compile job execution:

b = build("yy-compile")
out.println b.build.number


And finally you can also have a quick graphical overview of the execution in Status section. It is true that could be improved more, but for now it is acceptable, and can be used without any problem.


Build Flow plugin is in its early stages, in fact it is only at version 0.4. But will be a plugin to be considered in future, and I think it is good to know that it exists. Moreover is being developed by CloudBees folks so it is a guarantee of being fully supported by Jenkins.

We Keep Learning.
Alex.


Warning: In order to run parallel tasks with the plugin Anonymous users must have Read Job access (Jenkins -> Manage Jenkins -> Configure System). There is an issue already inserted into Jira to fix this problem.