Mostrando entradas con la etiqueta java. Mostrar todas las entradas

jueves, junio 07, 2018

Spring Boot + Cockroach DB in Kubernetes/OpenShift


In my previous post, I showed why CockroachDB might help you if you need a cloud native SQL database for your application. I explained how to install it in Kubernetes/OpenShift and how to validate that the data is replicated correctly.

In this post, I am going to show you how to use Cockroach DB in a Spring Boot application. Notice that Cockroach DB is compatible with PostgresSQL driver, so in terms of configuration is almost the same.

In this post, I assume that you have already a Cockroach DB cluster running in Kubernetes cluster as explained in my previous post.

For this example, I am using Fabric8 Maven Plugin to smoothly deploy a Spring Boot application to Kubernetes without having to worry so much about creating resources, creating Dockerfile and so on. Everything is automatically created and managed.

For this reason, pom.xml looks like:


Notice that apart from defining Fabric8 Maven Plugin I am also defining to use Spring Data JPA to make the integration between Spring Boot and JPA easier from the point of view of the developer.

Then you need to create a JPA entity and Spring Data Crud repository to interact with JPA.

Also, we need to create a controller who is responsible to get incoming requests, use the repository to make queries to DB and return results back to the caller.

Finally, you need to configure JPA to use the desired driver and dialect. In case of Spring Boot this is done in application.properties file.


The most important part here is that we need to use the PostgeSQL94 dialect. Notice that in url, we are using the postgresql jdbc url form. That's fine, since Cockroach uses the Postgres driver.

Now we need to create the database (customers) and the user (myuser) as configured in application.properties. To make it so, you just need to run cockroach shell and run some SQL commands:


Finally, you can deploy the application by running mvn clean fabric8:deploy. After that, the first time might take longer since needs to pull Docker images, you can start sending queries to the service.

As you can see it is really easy to start using a cloud-native DB like Cockroach DB in Spring Boot. If you want you can do exactly the same as in my previous post and start running queries to each of the nodes to validate that data is available correctly.

Code: https://github.com/lordofthejars/springboot-cockroach

We keep learning,
Alex.
Dôme épais, le jasmin, à la rose s'assemble, rive en fleurs, frais matin, nous appellent ensemble. (Flower Duet - Lakmé - Leo Delibes)
Music: https://www.youtube.com/watch?v=Vf42IP__ipw
Follow me at https://twitter.com/alexsotob


miércoles, enero 03, 2018

Cloud Native Applications with JWT


A native cloud application is an application that is developed for a cloud computing environment.

There is no specific answer to the question "what is a cloud-native application" but different concepts that must be met. 

One of the most important in my opinion is the ability to scale up and down at a rapid rate. And this means that our applications cannot have any state on each of the servers since if one server goes down or is scaled down, then the state stored in that server will be lost.

This is very well summarized at https://www.youtube.com/watch?v=osz-MT3AxqA where it is explained with a shopping cart example. In monolith approach, you store the products of the shopping cart in a server session, if the server went down then all products of shopping cart were lost as well. In a cloud-native app, where server instances can be scaled up and down quickly, it is important to not have this stateful behavior on your services and design them to be stateless.

There are different approaches to achieve this goal of implementing a stateless architecture but they can be summarized into two categories:
  • Use a distributed in-memory key/value data store like Infinispan.
  • Use a token which acts as a session between client and server using for example JWT.
In this post, I am going to introduce you the later approach.


JSON Web Token (JWT) is an open standard (RFC 7519) that defines a compact and self-contained way for securely transmitting information between parties as a JSON object.  

This information can be verified and trusted because it is digitally signed. JWTs can be signed using a secret using HMAC or a public/private key pair using RSA.

JSON Web Tokens consist of three Base64Url strings separated by dots which are: Header.Payload.Signature

So the idea basic idea for implementing stateless architecture on backend using JWT is the next one:
  1. When the user adds the first product, the backend service generates a new JWT token with the product added and sent it back to the frontend.
  2. When the user adds a new product, it sends the product to add and also the JWT token that was sent before by backend.
  3. Then the backend verifies that the token has not been modified (verifying the signature), then it gets the products from JWT payload added previously and add the new one to the list. Finally, it creates a new token with previous and new products and it sent it back to the frontend.
  4. The same process is repeated all the time.


So as you can see, now it is not necessary to maintain any state or add any new database service on backend side, you just need to sent back and forward the JWT token with the products inside.

I have recorded a video of a simple shopping cart example where I show the stateless nature of the solution. It can be seen at:


Also if you want to check the project that I used for recording you can take a look at https://github.com/lordofthejars/shop-jwt.

Notice that this is just a simple post so you can get the basic idea. But you need to take into consideration next things to use it in production:
  1. Use HTTPS instead of HTTP
  2. JWT just signs the token, if you want extra protection apart from HTTPS, use JWE to encrypt the payload of JWT token as well.
  3. Fingerprinting the token to avoid any man-in-the-middle attack and use these parameters as authentication parameters for the token.
  4. JWT can be used for passing authentication and authorization things as well.
You can watch my talk at JavaZone where I introduce some of these techniques:


The good part of JWT approach is that it simplifies a lot the deployment of the service, you don't need to deploy or configure any other distributed database to share the content across the cluster, which minimizes the problems related to the network for communicating to the distributed database or misconfiguring of any of the nodes.

The drawback is that the client needs to be aware to receive and sent back the token and deal with it. In backend side, you need to sign and verify every token all the time.

Note that this approach might work in some cases and might get into some troubles in others (for example if there are parallel connections to backend all of them modifying the token). This post just shows an example of how I implemented this stateless thing in a project with specific requirements, but in other cases it might be wrong to do it. A real shopping cart implementation would have some problems, but for the sake of simplicity and having a business model that everyone undertands, I decided to implement it in this way.

We keep learning,
Alex.
Turn it up, it's your favorite song (hey), Dance, dance, dance to the distortion, Turn it up (turn it up), keep it on repeat, Stumbling around like a wasted zombie (like a wasted zombie) (Chained to the Rhythm - Katy Perry)
Music: https://www.youtube.com/watch?v=Um7pMggPnug

Follow me at https://twitter.com/alexsotob

martes, septiembre 19, 2017

Testing code that uses Java System Properties

Sometimes your code uses any Java System Property to configure itself. Usually these classes are configuration classes that can get properties from different sources and one of valid one is using Java System Properties.

The problem is how to write tests for this code? Obviously to maintain your tests isolated you need to set and unset them for each test, restoring old value if for example you are dealing with a global property which is already set before executing tests, and of course in case of an error do not forget to unset/restore the value. So arrived at this point the test might look like:

Notice that this structure should be repeated for each test method that requires an specific system property, so this structure becomes a boilerplate code.

To avoid having to repeat this code over and over again, you can use System Rules project which is a collection of JUnit rules for testing code that uses java.lang.System 

The first thing you need to do is add System Rules dependency as test scope in your build tool, which in this case is com.github.stefanbirkner:system-rules:1.16.0.

Then you need to register the JUnit Rule into your test class.

In this case, you can freely set a System property in your test, the JUnit rule will take care of saving and restoring the System property.

That's it, really easy, no boilerplate code and help you maintaining your tests clean.

Just one notice, these kind of tests are not thread safe, so you need to be really cautious when you use for example surefire plugin with forks. One possible way to avoiding this is by using net.jcip.annotations.NotThreadSafe.class capabilities.

We keep learning,
Alex

Polly wants a cracker, I think I should get off her first, I think she wants some water, To put out the blow torch (Polly - Nirvana)


lunes, abril 10, 2017

Arquillian Persistence with MongoDB and Docker


In this screencast you are going to see how you can use Arquillian Persistence Extension (https://github.com/arquillian/arquillian-extension-persistence/tree/2.0.0) and Docker to write persistence tests for MongoDB.

To manage Docker lifecycle, I have used Arquillian Cube (http://arquillian.org/arquillian-cube/) and for populating data into MongoDB, the fairly new integration between Arquillian Persistence Extension (aka APE) and NoSQLUnit (https://github.com/lordofthejars/nosql-unit).


We keep learning,
Alex.

Ridi, Pagliaccio, Sul tuo amore infranto! Ridi del duol, che t'avvelena il cor! (Vesti la giubba (Pagliacci) - Leoncavallo)
Music: https://www.youtube.com/watch?v=Z0PMq4XGtZ4


jueves, septiembre 22, 2016

Authenticating with JGit


JGit is a lightweight, pure Java library implementing the Git version control system. You can do a lot of operations using Java language such as create or clone Git repos, create branches, make commits, rebase or tag, you can see this repo to learn how to use JGit and how to code the different commands.

But one thing that does not cover extensively is the authentication process. In this post I am going to show you how how to authenticate to a Git repository with JGit.

First thing to do is add JGit as dependency:


Then let's see a simple clone without authentication:

In this case no authentication method is set. Now let's see how to add a username and password in case of for example private repos:


In this case you only need to set as credential provider the UsernameAndPasswordCredentialsProvider and pass the required username and password.

The final scenario I am going to show here is how to authenticate against a git repository using your ssh keys, that is using (~/.ssh/id_rsa) and setting the passphrase to access it.


In this case you need to extend JSchConfigSessionFactory to be able to set passphrase to access to private key. To do it you set a custom UserInfo implementation where the getPassphrase method returns the passphrase to use and promptPassphrase method should return true.

After that you only need to set the transport configuration to the one created.

We keep learning,
Alex.
Chan eil inneal-ciùil a ghleusar, 'Dhùisgeas smuain mo chléibh gu aoibh, Mar nì duan o bheul nan caileag, Oidhche mhath leibh, beannachd leibh (Oidche Mhath Leibh - Ossian)
Music: https://www.youtube.com/watch?v=mi4SCOYAdEk

jueves, septiembre 11, 2014

Defend your Application with Hystrix


In previous post http://www.lordofthejars.com/2014/07/rxjava-java8-java-ee-7-arquillian-bliss.html we talked about microservices and how to orchestrate them using Reactive Extensions using (RxJava). But what's happen when one or many services fail because they have been halted or they throw an exception? In a distributed system like microservices architecture it is normal that a remote service may fail so communication between them should be fault tolerant and manage the latency in network calls properly.

And this is exactly what Hystrix does. Hystrix is a latency and fault tolerance library designed to isolate points of access to remote systems, services and 3rd party libraries, stop cascading failure and enable resilience in complex distributed systems where failure is inevitable.

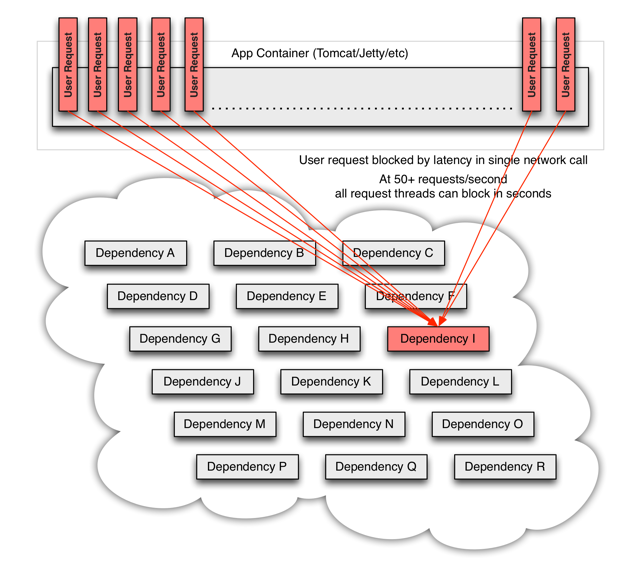
In a distributed architecture like microservices, one service may require to use other services as dependencies to accomplish his work. Every point in an application that reaches out over the network or into a client library that can potentially result in network requests is a source of failure. Worse than failures, these applications can also result in increased latencies between services. And this leaves us to another big problem, suppose you are developing a service on a Tomcat which will open two connections to two services, if one of this service takes more time than expected to send back a response, you will be spending one thread of Tomcat pool (the one of current request) doing nothing rather than waiting an answer. If you don't have a high traffic site this may be acceptable, but if you have a considerable amount of traffic all resources may become saturated and and block the whole server.

An schema from this scenario is provided on Hystrix wiki:


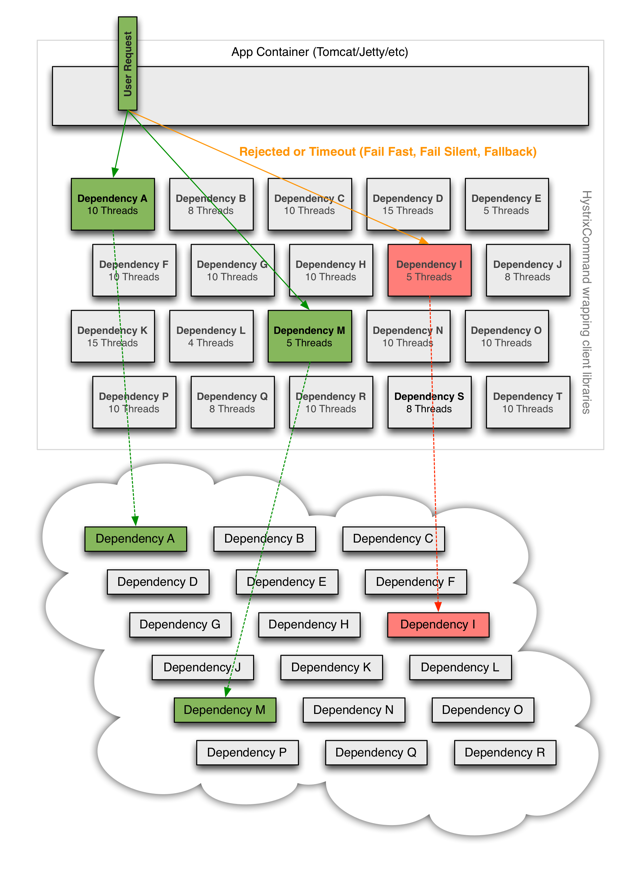
The way to avoid previous problem is to add a thread layer which isolates each dependency from each other. So each dependency (service) may contain a thread pool to execute that service. In Hystrix this layer is implemented by HystricxCommand object, so each call to an external service is wrapped to be executed within a different thread.

An schema of this scenario is provided on Hystrix wiki:


But also Hystrix provides other features:
  • Each thread has a timeout so a call may not be infinity waiting for a response.
  • Perform fallbacks wherever feasible to protect users from failure.
  • Measure success, failures (exceptions thrown by client), timeouts, and thread rejections and allows monitorizations.
  • Implements a circuit-breaker pattern which automatically or manually to stop all requests to an external service for a period of time if error percentage passes a threshold.
So let's start with a very simple example:


And then we can execute that command in a synchronous way by using execute method.

new HelloWorldCommand().execute();

Although this command is synchronous, it is executed in a different thread. By default Hystrix creates a thread pool for each command defined inside the same HystrixCommandGroupKey. In our example Hystrix creates a thread pool linked to all commands grouped to HelloWorld thread pool. Then for every execution, one thread is get from pool for executing the command.

But of course we can execute a command asynchornously (which perfectly fits to asynchronous JAX-RS 2.0 or Servlet 3.0 specifications). To do it simply run:


In fact synchronous calls are implemented internally by Hystrix as return new HelloWorldCommand().queue().get(); internally.

We have seen that we can execute a command synchronously and asynchronously, but there is a third method which is reactive execution using RxJava (you can read more about RxJava in my previous post www.lordofthejars.com/2014/07/rxjava-java8-java-ee-7-arquillian-bliss.html).

To do it you simply need to call observe method:


But sometimes things can go wrong and execution of command may throw an exception. All exceptions thrown from the run() method except for HystrixBadRequestException count as failures and trigger getFallback() and circuit-breaker logic (more to come about circuit-breaker). Any business exception that you don't want to count as service failure (for example illegal arguments) must be wrapped in HystrixBadRequestException.

But what happens with service failures, what Hystrix can do for us? In summary Hystrix can offer two things:
  1. A method to do something in case of a service failure. This method may return an empty, default value or stubbed value, or for example can invoke another service that can accomplish the same logic as the failing one.
  2. Some kind of logic to open and close the circuit automatically.

Fallback:

The method that is called when an exception occurs (except for HystrixBadRequestException) is getFallback(). You can override this method and provide your own implementation.


Circuit breaker:

Circuit breaker is a software pattern to detect failures and avoid receiving the same error constantly.
But also if the service is remote you can throw an error without waiting for TCP connection timeout.

Suppose next typical example: A system need to access database like 100 times per second and it fails. Same error will be thrown 100 times per second and because connection to remote Database implies a TCP connection, each client will wait until TCP timeout expires.

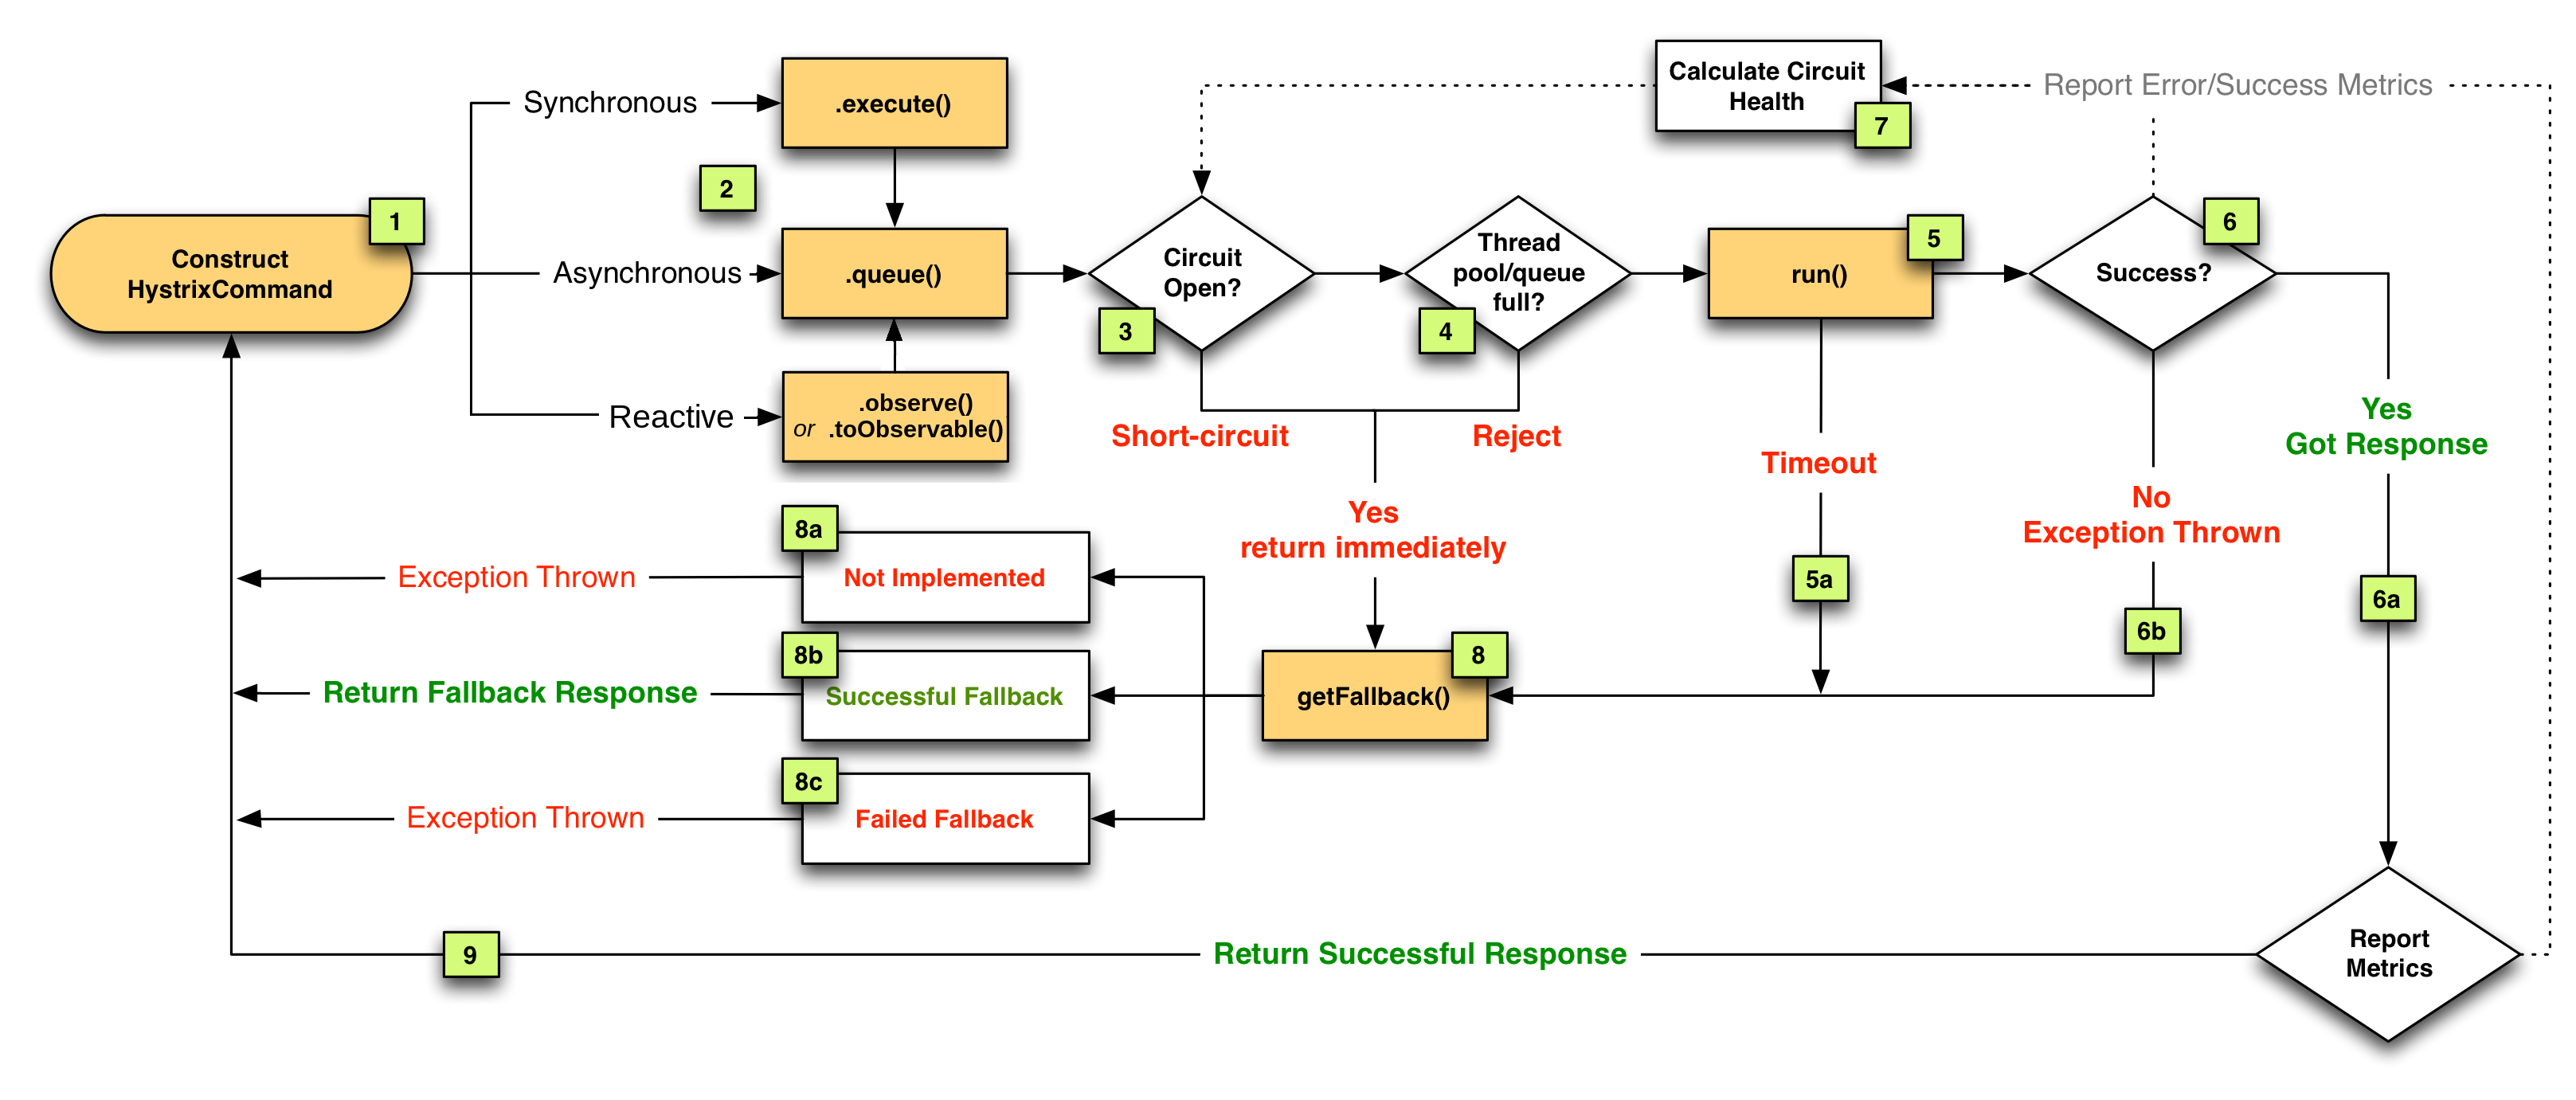
So it would be much useful if system could detect that a service is failing and avoid clients do more requests until some period of time. And this is what circuit breaker does. For each execution check if the circuit is open (tripped) which means that an error has occurred and the request will be not sent to service and fallback logic will be executed. But if the circuit is closed then the request is processed and may work.

Hystrix maintains an statistical database of number of success request vs failed requests. When Hystrix detects that in a defined spare of time, a threshold of failed commands has reached, it will open the circuit so future request will be able to return the error as soon as possible without having to consume resources to a service which probably is offline. But the good news is that Hystrix is also the responsible of closing the circuit. After elapsed time Hystrix will try to run again an incoming request, if this request is successful, then it will close the circuit and if not it will maintain the circuit opened.

In next diagram from Hystrix website you can see the interaction between Hystrix and circuit.


Now that we have seen the basics of Hystrix, let's see how to write tests to check that Hystrix works as expected.

Last thing before test. In Hystrix there is an special class called HystrixRequestContext. This class contains the state and manages the lifecycle of a request. You need to initialize this class if for example you want to Hystrix manages caching results or for logging purposes. Typically this class is initialized just before starting the business logic (for example in a Servlet Filter), and finished after request is processed. 

Let's use previous HelloWorldComand to validate that fallback method is called when circuit is open.


And the test. Keep in mind that I have added a lot of asserts in the test for academic purpose.


This is a very simple example, because execute method and fallback method are pretty simple, but if you think that execute method may contain complex logic and fallback method can be as complex too (for example retrieving data from another server, generate some kind of stubbed data, ...), then writing integration or functional tests that validates all this flow it starts having sense. Keep in mind that sometimes your fallback logic may depends on previous calls from current user or other users.

Hystrix also offers other features like cashing results so any command already executed within same HystrixRequestContext may return a cache result (https://github.com/Netflix/Hystrix/wiki/How-To-Use#Caching). Another feature it offers is collapsing. It enables automated batching of requests into a single HystrixCommand instance execution. It can use batch size and time as the triggers for executing a batch. 

As you may see Hystrix is a really simple yet powerful library, that you should take under consideration if your applications call external services.

We keep learning,
Alex.
Sing us a song, you're the piano man, Sing us a song tonight , Well, we're all in the mood for a melody , And you've got us feelin' alright (Piano Man - Billy Joel)

lunes, mayo 19, 2014

Java Cookbook Review


This new edition of Java cookbook is an amazing update of the book which covers a lot of the new features implemented in Java 8. 

The author writes in a clear and concise way how to solve some of the most of basic problems you will encounter in your day to day work in Java.

The book shows you from how to concatenate two strings to use functional interfaces.

Definitely if you have already had some experience (1-2 years) in Java and wants to improve your skills inside Java world, this book is for you. 

But it is even more, if you are a Java6 developer and want to update to Java7 or 8 this book is also for you. The author has taken the time to explain not only how to solve a problem using previous concepts of Java but also using the new ones.
In my opinion the book has only one contra, and it is that although new chapters about new Java API like javax.time has been added, the book spends so much pages on explaining some "outdated" technology like Swing or AWT.

Really pleasant book to read, very concise about what is the problem to be resolved, and although you consider yourself as a Java "expert", you will learn something for sure.

lunes, junio 10, 2013

Implementing Timeouts with FutureTask


Sometimes when you are writing some code that needs communication with external systems, not necessarily by using a socket, for example it can be using a serial port, we may need a way to implement a timeout algorithm, so if after some specified time, the request does not return a result, a timeout error should be thrown so user can act in consequence, and not wait indefinitely for a result that maybe will never come.

If the API being used contains a read method with timeout, then the problem is easily fixed by catching the exception, but if not, then you must implement yourself the timeout logic. To do that we can use FutureTask class.


Basically what we are doing is creating a FutureTask object, and creating a Callable interface which executes the call method which requires a timeout. Then we create a thread to execute it. And finally we call get method, which waits until the result is calculated, or if the timeout exceeds (in this case 5 seconds), TimeoutException is thrown.

So we have seen a really easy way to implement a timeout feature for our application.

We keep learning,
Alex
When the garden flowers baby are dead yes, And your mind [, your mind] is [so] full of RED, Don't you want somebody to love, Don't you need somebody to love (Somebody to love - Jefferson Airplane)

martes, junio 26, 2012

Bye, Bye, 5 * 60 * 1000 //Five Minutes, Bye, Bye


Llueve, llueve, y mientras nos mojamos como tontos. LLueve, llueve, y en un simple charco a veces nos ahogamos. (Llueve - Melendi)

In this post I am going to talk about one class that was first introduced in version 1.5, that I have used too much but talking with some people they said that they didn't know it exists. This class is TimeUnit.

TimeUnit class represents time durations at a given unit of granularity and also provides utility methods to convert to different units, and methods to perform timing delays.

TimeUnit is an enum with seven levels of granularity: DAYS, HOURS, MICROSECONDS, MILLISECONDS, MINUTES, NANOSECONDS and SECONDS.

The first feature that I find useful is the convert method. With this method you can say good bye to typical:

     private static final int FIVE_SECONDS_IN_MILLIS = 1000 * 5;

to something like:

     long duration = TimeUnit.MILLISECONDS.convert(5, TimeUnit.SECONDS);

But also equivalent operations in a better readable method exist. For example the same conversion could be expressed as:

     long duration = TimeUnit.SECONDS.toMillis(5);

The second really useful sets of operations are those related with stopping current thread.

For example you can sleep current thread with method:

     TimeUnit.MINUTES.sleep(5);

instead of:

     Thread.sleep(5*60*1000);

But you can also use it with join and wait with timeout.

     Thread t = new Thread();
     TimeUnit.SECONDS.timedJoin(t, 5);

So as we can see TimeUnit class is though in terms of expressiveness, you can do the same as you do previously but in a more fashionable way. Notice that you can also use static import and code will be even more readable.

Keep Learning,

martes, abril 10, 2012

Why does the rain fall from above? Why do fools fall in love? Why do they fall in love? (Why Do Fools Fall In Love - Frankie Lymon)


More often than not our applications need to send emails to users notifying for example that its account has been created, they have purchased an item, or simply password remaining. When you are writing unit tests there is no problem because probably you will be mocking up interface responsible of sending an email. But what's happen with integration tests?

Maybe the logical path to resolve this problem is installing an email server and execute these tests against it. It is not  a bad idea, but note that you will need to configure your environment before executing your tests.  Your tests will depend on external resources, and this is a bad idea for integration tests. Furthermore these integration tests would not be portable against multiple machines if an email server is not installed previously.

To avoid this problem Dumbster comes to save us. Dumbster is a fake smtp server designed for testing applications that send email messages. It is written in Java so you can start and stop it directly from your tests.

Let's see an example, suppose we are developing an electronic shop, and when an order is placed and email to customer should be sent.

In this case we are going to use Spring Framework 3.1 to create our service layer and will also help us in testing.

Because of teaching purpose, I am not using mail templates, or rich mime types.

First class I am going to show you is Order, which as you can imagine represents an order:

Most important method here is toEmail() that returns email body message.

Next class is service responsible of place an order to delivery system:

This service class uses Spring classes to send an email to customer. See that two methods are present, one that sends a simple message, and the other one called placeOrderWithInvoice that sends an email with an attachment, concretely an invoice in jpg format.

And finally Spring context file:

Note that mail configuration is surrounded by a profile. This means that Spring will only create these beans when application is started up in production mode, and in this case production smtp location is set.

And now let's start with testing:

First of all we must create a Spring context file to configure smtp server location.

See that we are importing application-context.xml file but now we are defining  a new beans profile called integration, where we are redefining smtp connection (changing hostname and port) pointing to fake server.

And finally the test itself.

It is important to explain next parts:
  • @ActiveProfiles is an annotation to tell Spring context which environment should be loaded.
  • SimpleSmtpServer is the main class of Dumbster.
  • @Rule is responsible of starting and stopping smtp server for each method execution.
We have created two tests one that sends a plain message (an_email_should_be_sent_to_customer_confirming_purchase()) and the other one that sends a message with an attachment (an_email_with_invoice_should_be_sent_to_special_customer_confirming_purchase()).

The private methods are simply helper classes to create required classes.

Note that Hamcrest matcher bodyEqualTo comes from BodySmtpMessage class developed specifically for this example.

I wish you have found this post useful, and can give you an alternative when you want to write integration tests involving smtp email service.

Keep Learning,
Alex.

jueves, abril 05, 2012

Hey! Teachers! Leave them kids alone! All in all it's just another brick in the wall. All in all you're just another brick in the wall. (Another Brick In The Wall - Pink Floyd)


In current post I am going to show you how to configure your application to use slf4j and logback as logger solution.

The Simple Logging Facade For Java (slf4j) is a simple facade for various logging frameworks, like JDK logging (java.util.logging), log4j, or logback. Even it contains a binding tat will delegate all logger operations to another well known logging facade called jakarta commons logging (JCL).

Logback is the successor of log4j logger API, in fact both projects have the same father, but logback offers some advantages over log4j, like better performance and less memory consumption, automatic reloading of configuration files, or filter capabilities, to cite a few features.

Native implementation of slf4j is logback, thus using both as logger framework implies zero memory and computational overhead.

First we are going to add slf4j and logback into pom as dependencies

Note that three files are required, one for slf4j, and two for logback. The last two dependencies will change depending on you logging framework, if for example you want to still use log4j, instead of having logback dependencies we would have log4j dependency itself and slf4j-log4j12.

Next step is creating the configuration file. Logback supports two formats of configurations files, the traditional way, using XML or using a Groovy DSL style. Let's start with traditional way, and we are going to create a file called logback.xml into classpath. File name is mandatory, but logback-test.xml is also valid. In case that both files are found in classpath the one ended with -test, will be used.

In general file is quite intuitive, we are defining the appender (the output of log messages), in this case to console, a pattern, and finally root level logger (DEBUG) and a different level logger (INFO) for classes present in foo package. 

Obviously this format is much readable than typical log4j.properties. Recall on additivity attribute, the appender named STDOUT is attached to two loggers, to root and to com.lordofthejars.foo. because the root logger is the ancestor of all loggers, logging request made by com.lordofthejars.foo logger will be output twice. To avoid this behavior you can set additivity attribute to false, and message will be printed only once.

Now let's create to classes which will use slf4j. First class called BarComponent is created on com.lordofthejars.bar:


Note two big differences from log4j. The first one is that is no longer required the typical if construction above each log call.  The other one is a pair of '{}'. Only after evaluating whether to log or not, logback will format the message replacing '{}' with the given string value.

The other one called FooComponent is created on com.lordofthejars.foo:

And now calling foo and bar method, with previous configuration, the output produced will be:

Notice that debug lines in foo method are not shown. This is ok, because we have set to be in this way. 

Next step we are going to take is configuring logback, but instead of using xml approach we are going to use groovy DSL approach. Logback will give preference to groovy configuration over xml configuration, so keep in mind it if you are mixing configuration approaches.

So first thing to do is add groovy as dependency.

And then we are going to create the same configuration created previously but in groovy format.

You can identify the same parameters of xml approach but as groovy functions.

I wish you have found this post useful, and in next project, if you can, use slf4j in conjunction with logback, your application will run faster than logging with log4j.

Keep Learning,
Alex.


domingo, marzo 18, 2012

Moi je pense à l'enfant, Entouré de soldats, Moi je pense à l'enfant, Qui demande pourquoi (Non Non Rien N'a Changé - Les Poppys)


After 8 years developing server and embedded applications using Hibernate as ORM, squeezing my brain seeking solutions to improve Hibernate performance, reading blogs and attending conferences, I decided to share this knowledge acquired during these years with you.

This is the first post of many more posts to come:


Last year I went to Devoxx as speaker but also I attended Patrycja Wegrzynowicz conference about Hibernate Anti-Patterns. In that presentation Patrycja shows us an anti-pattern that shocks me because it proved to expect the unexpected.

We are going to see the effect it has when Hibernate detects a dirty collection and should re-create it.

Let's start with the model we are going to use, only two classes related with one-to-many association:


In previous classes, we should pay attention in three important points:
  • we are annotating at property level instead of field level.
  • @OneToMany and @ManyToOne uses default options (apart from cascade definition)
  • officers getter on Starship class returns an immutable list. 
To test model configuration, we are going to create a test which creates and persists one Starship and seven Officers, and in different Transaction and EntityManager finds created Starship.

Now that we have created this test, we can run it and we are going to observe Hibernate console output.

See the number of queries executed during first commit (persisting objects) and during commit of second transaction (finding a Starship). In total and ignoring sequence generator, we can count 22 inserts, 2 selects and 1 delete, not bad when we are only creating 8 objects and 1 find by primary key.

At this point let's examine why these SQL queries are executed:

First eight inserts are unavoidable; they are required by inserting data into database.

Next seven inserts are required because we have annotated getOfficers property without mappedBy attribute. If we look closely at Hibernate documentation, it points us that “Without describing any physical mapping, a unidirectional one to many with join table is used.”

Next group of queries are even stranger, the first select statement is to find Starship by id, but what are these deletes and inserts of data that we have already created?

During commit Hibernate validates whether collection properties are dirty by comparing object references. When a collection is marked as dirty, Hibernate needs to re-create whole collection, even containing the same objects. In our case when we are getting officers we are returning a different collection instance, concretely an unmodifiable list, so Hibernate considers officers collection as dirty.

Because a join table is used, Starship_Officer table should be re-created, deleting previous inserted tuples and inserting the new ones (although they have the same values).

Let's try to fix this problem. We start by mapping a bidirectional one-to-many association, with many-to-one side as owning side.

And now we rerun the same test again and we inspect the output again.


Although we have reduced the number of SQL statements, from 25 to 10, we still have an unnecessary query, the ones just in commit section of second transaction. Why if officers are lazy by default (JPA specification), and we are not getting officers in transaction, Hibernate executes a select on Officers table?  By the same reason as previously configuration, returned collection has different Java identifier, so Hibernate marks it as newly instantiated collection, but now obviously join table operations are no longer required. We have reduced the number of queries but we still have a performance problem. It is likely that we'll need some other solution, and the solution is not the most obvious one, we are not going to return collection objects returned by Hibernate, we might expand on this later, but we are going to change annotations location.

What we are going to do is to change mapping location from property approach to use field mapping. Simply we are going to move all annotations to class attributes rather than on getters.


And finally we are going to run the test again, and see what's happen:


Why using property mapping Hibernate runs queries during commit and using field mapping are not executed? When a Transaction is committed, Hibernate execute a flush to  synchronize the underlying persistent store with persistable state held in memory. When property mapping is used, Hibernate calls getter/setter methods to synchronize data, and in case of getOfficers method, it returns a dirty collection (because of unmodifiableList call). On the other side when we are using field mapping, Hibernate gets directly the field, so collection is not considered dirty and no re-creation is required.

But we have not finished yet, I suppose you are wondering why we have not removed Collections.unmodifiableList from getter, returning Hibernate collection? Yes I agree with you that we finished quickly, and change would look like @OneToMany(cascade={CascadeType.ALL}) public List<Officer> getOfficers() {officers;} but returning original collection ends up with an encapsulation problem, in fact we are broken encapsulation!. We could add to mutable list anything we like; we could apply uncontrolled changes to the internal state of an object.

Using an  unmodifiableList is an approach to use to avoid breaking encapsulation, but of course we could have used different accessors for public access and hibernate access, and not calling  Collections.unmodifiableList method.

Considering what we have seen today, I suggest you to use always field annotations instead of property mapping, we are going to save from a plenty of surprises.

Hope you have found this post useful.

Screencast of example shown here:


Download code
Music: http://www.youtube.com/watch?v=H14VIsnr6aA


lunes, septiembre 19, 2011

The Bell That Rings Inside Your Mind, Is Challenging The Doors Of Time, It’s A Kind Of Magic (A Kind Of Magic - Queen)


During class design we should take decisions about the assignment of responsibilities that will have every class. If we have chosen well, systems tend to be easier to understand, maintain and extend.

Almost all of our projects have a persistence layer, either relational database, document stores, or simply XML files. And typically you will use DAO pattern to implement abstract interface between your business objects and your data store.

In this post but I am going to explain another pattern that can be used instead of DAO pattern. Active record pattern is an architectural pattern that force you to implement CRUD operations on your model  class, hence model class itself is responsible for saving, deleting, loading from database.

There are many strategies to follow to implement this pattern, but for me, the best one is using Aspect Oriented Programming, because we are still maintaining separation of concerns favoring isolated unit testing, and not breaking encapsulation.

Aspect-oriented programming entails breaking down program logic into distinct parts. These parts are known as crosscutting concerns because they "cut across" multiple abstractions in a program. Example of crosscutting concerns can be logging, transaction manager, error manager or splitting large datasets. For people that have worked with aspects not much secret here, to use them you simply create an aspect defining the advice and the pointcut, and your aspect is ready to be executed. 

I guess most of us use aspects-oriented programming as I have described in previous paragraph, but will be fewer that uses ITD (Inter-type Declarations) feature.

Inter-type Declarations provide a way to express crosscutting concerns affecting the structure of modules enabling programmers to declare members of another class.

As we say in my country "bad said but well understood", ITD is a way to declare new components (attributes, methods, annotations) of a class from an aspect.

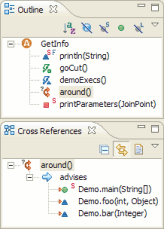
AspectJ is an aspect-oriented extension for Java. AspectJ supports ITD, and for this reason will be used in this post. Moreover I recommend you install AJDT plugin because it will help you develop aspects and having a quick overview of which Java classes are aspecterized.


If you have not understood what ITD is, don't worry, it is a typical example of concept that is best understood with an example.

Let's start with simple example:

Imagine having to model a car. You would have a car class, with some attributes, for this example three attributes (vin number, miles drived and model) is enough.


It is a POJO with three attributes and their getters and setters.

Now we want to add persistence layer, but in this case we are going to persist our POJOs in a XML file instead of a database. So Car objects should be transformed to XML stream. For this purpose JAXB annotations will be used. For those who don’t know, JAXB allows developers to map Java classes to XML representations and viceversa.

I am sure that first idea that comes to your brain is annotating Car class with @XmlRootElement (annotation to map root element in JAXB). Don’t do that, use aspects. Your first mission is trying to maintain Car file as simple as possible. To add an annotation using ITD, is as simple as:


With @type you are exposing which member is annotated. In this case only class. Other possibilities are @method, @constructor and @field. Then elements pattern that should be annotated, in this case Car class, but you could use any regular expressions like org.alexsotob..*. Finally the annotation.

Next step is using JAXB classes to marshalling/unmarshalling objects. In this example I am using spring-oxm package and briefly you will understand why. Spring-oxm is a part of spring-core that contains classes for dealing with O/X Mapping.

This spring module contains one class for each Xml binding supported. In our case Jaxb2Marshaller is used as marshaller and unmarshaller.

It is possible that you are thinking of creating a service class where you inject Jaxb2Marshaller instance. This service would include two methods (save and load) with Car class as argument or return value. Sorry but, doing this, you are implementing DAO pattern. Let's implement Active Record pattern approach. And as you may suppose, aspectj comes to rescue you to avoid mixing concepts in same source file.

Let's update previous aspect file so all required logic by JAXB will be in same file.


See that apart from annotating Car class we are creating two methods, and an annotated attribute.  Attributes must follow same rule as methods,  <class name> dot (.) and <attribute name>. Note that in this case attribute is transient because should not be bound in XML file.

Last step is configuring marshaller in spring context file.

Not much secret. Now let's code a unit test.

Run junit class and BOOM all red, with an amazing NullPointerException. Marshaller is created in Spring context, but not injected into Car class (Car is not managed by spring container, so is impossible to be injected). And now I suppose you are telling yourself: "I told you a service layer would be better, because it would be managed by Spring and autowired would work perfect.". But wait and see. How about using spring-aspects module? Spring Aspects contains an annotation-driven aspect (@Configurable) allowing dependency injection of any object, whatever is or not controlled by container. So let's apply last two changes and the application will run.

First of all is creating a new aspectj file to annotate Car class as Configurable.

And finally modify spring context file to allow @Configurable annotation.

Adding <context:spring-configured></context:spring-configured> namespace is enough. As a result, any time you instantiate an object (via the "new" keyword), Spring will attempt to perform dependency injection on that object.

Now run unit test again and green will invade your computer :D.

ITD is a really nice solution to design classes with its own responsibilities. It gives you the oportunity of writing maintainable and understandable code, without loosing encapsulation. Of course you should take care of not to have high coupling in aspected classes, and convert them in "God Classes".

Note that implementing same approach but using relational database, it is as simple as changing Jaxb2Marshaller to EntityManager.

I wish you have found this post useful.

Download Full code

Music:  http://www.youtube.com/watch?v=KLFZzInXAWI

lunes, septiembre 12, 2011

Questa di Marinella è la storia vera Che scivolò nel fiume a Primavera Ma il vento che la vide così bella Dal fiume la portò sopra una stella (Canzone Di Marinella - Mina)


Most of us use Maven as a build automation tool. One of most important section are those related to dependencies. Typically projects have dependencies to external libraries like Spring, Hibernate, Slf4j, ... which are downloaded from External Maven Repository Servers like mvnrepository, ibiblio or from own Internal Maven Repository Server using JFrog or Nexus. This scenario but does not cover all possible cases.

It is uncommon that your project requires an external library that is not present in any repository, but can occurs, and in these cases are where you use company Internal Maven Repository to upload these artifacts. But this is not always possible, and typical example is when you are writing in a blog about a beta library and it is not present in any repository, and you want to add this library to pom file. Would be perfect if Maven could resolve these dependencies too without packaging them into project. So what can we do?

There are some alternatives:

- packaging .class files of external library into your project, so they are packaged as project files.
- asking library creators to upload Milestones to public repositories.
- create your own public Maven Repository.
- using GitHub?

Using GitHub, YES!!. You can configure your GitHub account as Maven Repository. In my case I always upload sample code to GitHub. Why not creating a GitHub project that acts as a Maven Repository and poms referencing to this repository?

Now I will summarize steps that shall be followed: (assuming that you have already created a project).
  1. Create a GitHub repository.
  2. Initialize local directory as Git repo.
  3. Modify project pom so distribution management tag points to local repository.
  4. Perform deploy goal so artifact is deployed to local repository.
  5. Push changes to GitHub.
  6. Nothing more. Now other project poms can use your repository.

Let's get down to work:

The first thing you should know is that the project I want to upload to Maven Repository is located at /media/share/workspace/github-test and project that will have a dependency will be located at /media/share/workspace/bar.

First step is creating a new GitHub repository. So login to your GitHub account and create a new repository. In my case I have named maven-repository.


Second step is initialize local directory as Git repository.

Third step is adding distributionManagement tag pointing to repository so when project is deployed, artifact is created to Git directory.

See that url tag is pointing to previously created Git directory (local disk).

Fourth Step is running mvn -DperformRelease=true clean deploy. Project is compiled, tested, and packaged. Now go to local repository and see what has appeared.

Fifth Step implies two operations, committing changes and pushing them to GitHub.

See that first command is adding root directory. Then all files are committed to local repository and pushed to GitHub repository.


Sixth Step if you want to call it step, is adding repository tag to project that requires published component. In our case bar project requires it.

This pom represents a project that wants to use github-test module. It is important to note that repository url is special (not showed when you explore GitHub projects with navigator), and is https://github.com/maggandalf/maven-repository/raw/master. After repository name (in this case maven-repository) you should concatenate /raw/master. raw because you want to access to files without any decoration (no HTML), and master because it is the branch name.

When bar project is being compiled, github-test artifact is downloaded.


I think it is a good approach when you need to upload a Maven artifact temporally, or simply because your project requires a milestone version of artifact that is not uploaded into any repository.

I hope you like this post, and ... MOVE TO GIT.

Music: http://www.youtube.com/watch?v=TL69oTe6HHY

viernes, julio 22, 2011

Tu I Jo Asseguts A La Barra D’un Bar, Sona Bona Música I Som Davant Del Mar (Al Mar - Manel)


In current post I am going to talk about differences between Hamcrest and Fest Fluent Assertions. The reason of this post is not to tell you if you should use one or the other. I only want to show you how both implementations resolve the problem of writing readable assertions.

To compare both APIs I have created two JUnits, one using Hamcrest assertions and one where Fest assertions are used.

The comparision is done using only common operations (Logical, Object, Collections, Number, Text) and creation of new matchers. I am not going to compare which ones have implemented more matchers or kinds of matchers, because I think this is not a parameter to use for choosing what library fits better to your project. Moreover in both APIs you can extend them for creating your own matchers.

Let's start showing model representing a simple modelling of Studio Ghibli http://en.wikipedia.org/wiki/Studio_Ghibli movies information. 


Imports:

Hamcrest requires 11 imports:

while Fest requires 2 imports:

in fact this is not a good or bad thing how many imports are required, but it is always a headache remember where a required assertion is packaged. Because Fest uses Fluent Interfaces approach with two imports all operations are available with IDE's "auto-completation" feature.

Simple asserts:

Not much difference between Hamcrest and Fest, in case of Fest verb is also added in method name creating a much readable assert.

Hamcrest


Fest


Logical asserts:

In this case we find a big difference. Hamcrest supports logical operations and can be used independently, meanwhile logical operations in Fest are a part of the method:

Hamcrest


Fest


Object asserts:

Same object operations are provided in both APIs. There is only one difference, in Fest you can chain callings of methods, so number of asserts compared to Hamcrest are fewer.

Hamcrest


Fest


Collection asserts:

In case of Collections is where they differ more from each other. Hamcrest deals with Collections and Maps with methods like hasKey, hasValue, hasItem. Fest uses a more generic calling like includes, excludes, entry; I have not found any way for asserting key instead of key-value in Fest.
Moreover in this example I also compare how to access a bean property in each elements of collection. From my point of view I think that Fest has a better approach resolving this case.

Hamcrest

Fest


Number asserts:

As in simple asserts, there is no much difference between them.

Hamcrest


Fest


String asserts:


Hamcrest

Fest


As you have noted Hamcrest and Fest are very similar, but I think that Fest solves the same problem but in much cleaner way.

Although both solutions offer very similar matchers, each implementation is so different, so creation of a custom matcher is different too. In Hamcrest you should create a class that extends from TypeSafeMatcher. In Fest there are two possibilities, first one is extending Fest-assertions with custom condition (using already Fest structure and defined types), and the second one is extending with custom assertion (creating a new assertThat implementation for required type).

Hamcrest extension for asserting that a character is a human:


In case of Fest there are two approaches, the first one, that requires that our class extends from Condition. As I told previously, extending Condition implies using the same kind of types supported by org.fest.assertions.Assertions.assertThat method (object, int, short, list, array, ...). In previous case our type is Character, and of course does not exist an overload of Assertions.assertThat method with Character, but java.lang.Object. So our class should be:


As you probably noted, you need to cast character variable to Character, neither a clean solution nor optimal. But of course you can use second method, extending from GenericAssert. This class (a Fluent class) will be the responsible of implementing an assertThat that accepts Character objects, and moreover will implement matcher methods. And I say methods because unlike Hamcrest, Fest can contain more than one matcher in each class. For example if there are some tests that we are asserting if character is human, and in another ones asserting if is human and if has a name, in Hamcrest we should create two classes. In Fest you don't have this restriction.


As it is told in Fest site "Which one to use? Hamcrest or FEST-Assert? It is up to you...it depends on the needs of your project and your coding style!"

Download code.

Music: http://www.youtube.com/watch?v=GjWLXZ4WdQU