martes, mayo 29, 2018

CockroachDB. A cloud native SQL database in Kubernetes.


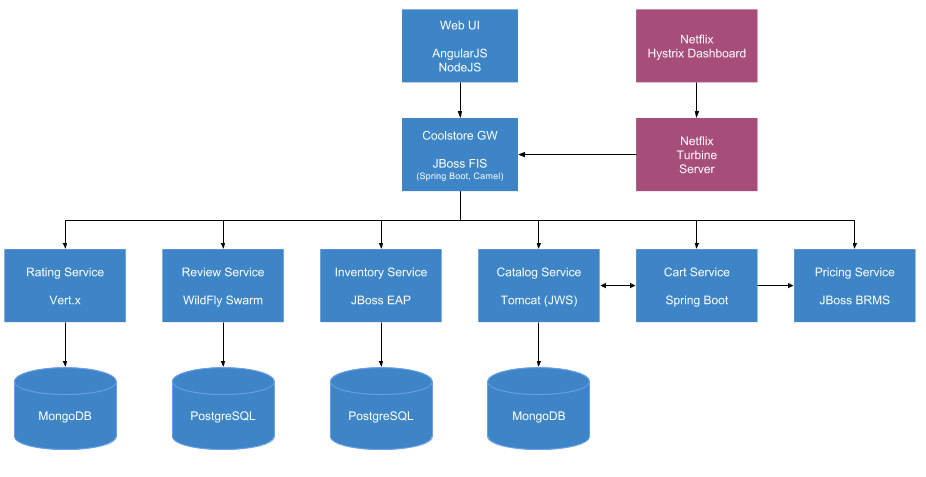
CockroachDB 2.0 has just been released. For those who don't know what it is, it can be summarized as a SQL database for the cloud era. One of the best things about CockroachDB is that it automatically scales, rebalances and repairs itself without sacrificing the SQL language. Moreover, Cockroach implements ACID transactions,  so your data is always in a known state.

In this post, I am going to explain how to install it in Kubernetes/OpenShift, insert some data and validate that it has been replicated in all nodes. In next post, I am going to show you how to use it with Spring Boot + JPA.

The first thing you need to have is a Kubernetes/OpenShift cluster to be used. You can use Minikube or Minishift for this purpose. In my case, I am using Minishift but I will provide equivalent commands for Minikube.

After having everything installed, you need to launch the Cockroach cluster.

In case of Kuberneteskubectl create -f https://raw.githubusercontent.com/cockroachdb/cockroach/master/cloud/kubernetes/cockroachdb-statefulset.yaml

In case of OpenShiftoc apply -f https://raw.githubusercontent.com/cockroachdb/cockroach/master/cloud/kubernetes/cockroachdb-statefulset.yaml

Then you need to initialize the cluster:

In case of Kuberneteskubectl create -f https://raw.githubusercontent.com/cockroachdb/cockroach/master/cloud/kubernetes/cluster-init.yaml

In case of OpenShift: oc apply -f https://raw.githubusercontent.com/cockroachdb/cockroach/master/cloud/kubernetes/cluster-init.yaml

Then let's configure the cluster so we can access the admin UI:

In case of Kuberneteskubectl port-forward cockroachdb-0 8080

In case of OpenShift: oc expose svc  cockroachdb-public --port=8080 --name=r1

Now let's create a database and a table and see how it is replicated across all the cluster easily. Cockroach comes with a service that offers a load-balanced virtual IP for clients to access the database.

In case of Kubernetes: kubectl run cockroachdb -it --image=cockroachdb/cockroach --rm --restart=Never -- sql --insecure --host=cockroachdb-public

In case of OpenShift: oc run cockroachdb -it --image=cockroachdb/cockroach --rm --restart=Never     -- sql --insecure --host=cockroachdb-public

And finally in the opened console just type some SQL calls:

create database games;
use games;
create table game (id int, title varchar(30));
insert into game values (1, 'The Secret of Monkey Island');

So far, we have a new database, table, and entry in CockroachDB. Open admin UI, push Databases and you'll see something like this:


You can see that the database and the table have been created. Now let's see how we can know that everything has been replicated correctly. Push Overview and you'll see something like:


So pay attention to Replicas column. In all nodes, the number is exactly the same number, this means that all data in the cluster has been replicated X times.

Now let's increase by one the number of replicas and just refresh the page to see that the new node initially has not the same replica count.

In case of Kuberneteskubectl scale statefulset cockroachdb --replicas=4

In case of OpenShift: oc scale statefulset cockroachdb --replicas=4


Another thing you can do is to just enter each container and validate that when connecting to localhost, the inserted data is there.

In case of Kuberneteskubectl exec -it cockroachdb-0 /bin/bash

In case of OpenShiftoc exec -it cockroachdb-0 /bin/bash

Then inside the container just run: ./cockroach dump games --insecure

And you will see that CLI connects by default to the current node (localhost) and dumps the content of games db.

Repeat the same with other nodes cockroachdb-1 and cockroachdb-2 and you should see exactly the same.

So as you can see, it is really easy to use SQL in scale way thanks to Cockroach DB. In next post, we are going to see how to integrate Spring Boot + JPA with Cockroach DB, and deploying it into Kubernetes. 

We keep learning,
Alex
I can see a rainbow, In your tears as they fall on down, I can see your soul grow, Through the pain as they hit the ground (Rainbow - Sia)
Music: https://www.youtube.com/watch?v=paXOkGMyG8M

Follow me at https://twitter.com/alexsotob


lunes, marzo 26, 2018

Arquillian Chameleon. Simplifying your Arquillian tests.


Arquillian Chameleon was born to simplify the configuration of Arquillian tests. I am proud to announce that with version 1.0.0.CR2 we have not only simplified how to configure Arquillian tests but also how to write them.

With this new release, three new simplifications have been added:
  • You only need to use 1 (or at most 2 dependencies just in case you want to use auto-deployment feature)
  • It is not necessary to add any dependency to define which application server you want to use to run tests. Even not necessary to use arquillian.xml file to define it.
  • It is not necessary to use ShrinkWrap to build your package. You can still use it, but you can delegate the process of creating the package to a custom SPI.
So let's start.

Dependency

You only need to add one dependency you don't need to add Arquillian dependency + container dependency anymore.

Definition of container 

Now to define a container you just need to use a special runner and special annotation:

You just need to use ArquillianChameleon runner and the special annotation @ChameleonTarget to define which container you want to use. In this example, Wildfly 11 with the managed mode is configured.

When running this test, classpath is going to be configured with Arquillian Wildfly dependency, download the application server and behave as any other Arquillian test.


AutoDeployment

Arquillan allows you to define a Java SPI to describe how the archive should be created. This effectively means that no @Deployment method is required if you provide an implementation which automatically creates the deployment file.

Arquillian Chameleon provides at this time two implementations:
  1. File which deploys an already created file. You need to set the location of the file.
  2. Maven which runs using embedded Maven the build of the project and the generated archive is used as deployment archive.
For this example, I am going to use a multi-module project as an example, but notice that if you create a none multimodule project, then defaults works perfectly.


Notice that depending on the method you choose (File or Maven) you need to add the implementation on classpath.

In this case, I choose to use the Maven approach which means that the archive is generated by building all project.

Two things that are specific to this test and needs to be customized (instead of defaults) because of the example.

First one is the pom location. By default, the @MavenBuild annotation uses the pom.xml where the test is executed. In case of multimodule project, you don't want to run the build from module where test is defined but from the root of the project, so you get a complete archive with all dependencies. For this case you need to set it where is located.

The second one is where is the archive generated to be used to deploy. By default, you don't need to specify anything since in case of none multimodule project you are only generating one file. But in case of multimodule projects, you are generating multiple archives, so you need to specify which module contains the final archive.

And that's all, when you run this test, Arquillian will download Wildfly, start it, runs the build to get the final deployment file (such as .war), deploy it and finally run the test.

Notice that also there is @DeploymentParameters annotation which is not mandatory to be used, but allows you to configure the deployment as you do with @Deployment annotation, such as setting a deployment name or changing the mode from a container (the default one) to as client.


Conclusions

You can see that everything has been simplified a lot. The idea is to offer a similar experience that you get when running a Spring tests.

We keep learning,

Alex
Not knowing what it was, I will not give you up this time, But darling, just kiss me slow, your heart is all I own, And in your eyes you're holding mine (Perfect - Ed Sheraan)


lunes, febrero 12, 2018

Repeatable Annotations in Java 8


With Java 8 you are able to repeat the same annotation to a declaration or type. For example, to register that one class should only be accessible at runtime by specific roles, you could write something like:

Notice that now @Role is repeated several times. For compatibility reasons, repeating annotations are stored in a container annotation, so instead of writing just one annotation you need to write two, so in the previous case, you need to create @Role and @Roles annotations.

Notice that you need to create two annotations, one which is the "plural" part of the annotation where you set return type of value method to be an array of the annotation that can be used multiple times. The other annotation can be used multiple time in the scope where it is defined and must be annotated with @Repeatable annotation.

This is how I did all the time since Java 8 allows to do it. But last week, during a code review my mate George Gastaldi pointed me out how they are implementing these repeatable annotations in javax.validation spec.  Of course, it is not completely different but I think that looks pretty much clear from point of view implementation since everything is implemented within the same archive and also, in my opinion, the name looks much natural. 

Notice that now everything is placed in the same archive. Since usually you only need to refer to @Role class, and not @Roles (now @Role.List) annotation you can hide this annotation as an inner annotation. Also in case of defining several annotations, this approach makes everything look more compact, instead of having of populating the hierarchy with "duplicated" classes serving the same purpose, you only create one.

Of course, I am not saying that the approach of having two classes is wrong, at the end is about preferences since both are really similar. But after implementing repeatable annotations in this way, I think that it is cleaner and compact solution having everything defined in one class.

We keep learning,
Alex.
Jo sóc l'hipopòtam, i crec que el lleó, ha de refrescar-se per estar molt millor (El Lleó Vergonyós - El Pot Petit)
Music: https://www.youtube.com/watch?v=lYriMzzMsUw

Follow me at https://twitter.com/alexsotob


lunes, enero 08, 2018

Secret Rotation for JWT tokens


When you are using JSON Web Token (JWT), or any other token technology that requires to sign or encrypt payload information, it is important to set an expiration date to the token, so if the token expires, you can either assume that this might be considered a security breach and you refuse any communication using this token, or you decide to enable the token by updating it with new expiry date.

But it is also important to use some kind of secret rotation algorithm, so the secret used to sign or encrypt a token is periodically updated, so if the secret is compromised the tokens leaked by this key is less. Also in this way you are decreasing the probability of a secret being broken.

There are several strategies for implementing this, but in this post, I am going to explain how I implemented secret rotation in one project I developed some years ago to sign JWT tokens with HMAC algorithm.

I am going to show how to create a JWT token in Java.


Notice that what you need to do here is creating an algorithm object setting HMAC algorithm and set a secret that is used to sign and verify instance.

So what we need is to rotate this algorithm instance every X minutes, so the probability of breaking the secret, and that the broken secret is still valid, becomes very low.

So how to rotate secrets? Well, with a really simple algorithm that everyone (even if you are not a crypto expert) can understand. Just using time.

So to generate the secret, you need a string, in the previous example was secret String, of course, this is not so secure, so the idea is to compose this secret string by a root (something we called the big bang part) + a shifted part time. In summary the secret is <bigbang>+<timeInMilliseconds>

Bing bang part has no mystery, it is just a static part, for example, my_super_secret.

The interesting part is the time part. Suppose you want to renew secret every second. You only need to do this:

I am just putting 0s to milliseconds part, so if I run this I get something like:

1515091335543
1515091335500
1515091335500

Notice that although between second and third print, it has passed 50 milliseconds, the time part is exactly the same. And it will be the same during the same second.

Of course, this is an extreme example where the secret is changed every second but the idea is that you remove the part of the time that you want to ignore, and fill it with 0s. For this reason, first, you are dividing the time and then multiply by the same number.

For example, suppose that you want to rotate the secret every 10 minutes you just need to divide and multiply for 600000.

There are two problems with this approach that can be fixed although one of them is not really a big issue.

The first one is that since you are truncating the time if you want to change the secret every minute and for example, the first calculation occurs in the middle of a minute, then for just this initial case, the rotation will occur after 30 seconds and not 1 minute. Not a big problem and in our project, we did nothing to fix it.

The second one is what's happening with tokens that were signed just before the secret rotation, they are still valid and you need to be able to verify them too, not with the new secret but with previous one.

To fix this, what we did was to create a valid window, where the previous valid secret was also maintained. So when the system receives a token, it is verified with the current secret, if it passes then we can do any other checks and work with it, if not then the token is verified by the previous secret. If it passes, the token is recreated and signed with the new secret, and if not then obviously this token is invalid and must be refused.


To create the algorithm object for JWT you only need to do something like:


What I really like about this solution is:

  • It is clean, no need for extra elements on your system.
  • No need for triggered threads that are run asynchronously to update the secret.
  • It is really performant, you don't need to access an external system.
  • Testing the service is really easy.
  • The process of verifying is responsible for rotating the secret.
  • It is really easy to scale, in fact, you don't need to do anything, you can add more and more instances of the same service and all of them will rotate the secret at the same time, and all of them will use the same secret, so the rotating process is really stateless, you can scale up or down your instances and all instances will continue to be able to verify tokens signed by other instances.

But of course there are some drawbacks:

  • You still need to share a part of the secret (the big bang part) to each of the services in a secure way. Maybe using Kubernetes secrets, Vault from Hashicorp or if you are not using microservices, you can just copy a file into a concrete location and when the service is up and running, read the big bang part, and then just remove it.
  • If your physical servers are in different time zones, then using this approach might be more problematic. Also, you need that the servers are more or less synchronized. Since you are storing the previous token and current token, it is not necessary that they are synced in the same second and some seconds delay is still possible without any issue.


So we have seen a really simple way of rotating secrets so you can keep your tokens safer. Of course, there are other ways of doing the same. In this post, I just have explained how I did it in a monolith application we developed three years ago, and it worked really well.

We keep learning,
Alex.
You just want attention, you don't want my heart, Maybe you just hate the thought of me with someone new, Yeah, you just want attention, I knew from the start, You're just making sure I'm never gettin' over you (Attention - Charlie Puth)
Music: https://www.youtube.com/watch?v=nfs8NYg7yQM

Follow me at https://twitter.com/alexsotob

miércoles, enero 03, 2018

Cloud Native Applications with JWT


A native cloud application is an application that is developed for a cloud computing environment.

There is no specific answer to the question "what is a cloud-native application" but different concepts that must be met. 

One of the most important in my opinion is the ability to scale up and down at a rapid rate. And this means that our applications cannot have any state on each of the servers since if one server goes down or is scaled down, then the state stored in that server will be lost.

This is very well summarized at https://www.youtube.com/watch?v=osz-MT3AxqA where it is explained with a shopping cart example. In monolith approach, you store the products of the shopping cart in a server session, if the server went down then all products of shopping cart were lost as well. In a cloud-native app, where server instances can be scaled up and down quickly, it is important to not have this stateful behavior on your services and design them to be stateless.

There are different approaches to achieve this goal of implementing a stateless architecture but they can be summarized into two categories:
  • Use a distributed in-memory key/value data store like Infinispan.
  • Use a token which acts as a session between client and server using for example JWT.
In this post, I am going to introduce you the later approach.


JSON Web Token (JWT) is an open standard (RFC 7519) that defines a compact and self-contained way for securely transmitting information between parties as a JSON object.  

This information can be verified and trusted because it is digitally signed. JWTs can be signed using a secret using HMAC or a public/private key pair using RSA.

JSON Web Tokens consist of three Base64Url strings separated by dots which are: Header.Payload.Signature

So the idea basic idea for implementing stateless architecture on backend using JWT is the next one:
  1. When the user adds the first product, the backend service generates a new JWT token with the product added and sent it back to the frontend.
  2. When the user adds a new product, it sends the product to add and also the JWT token that was sent before by backend.
  3. Then the backend verifies that the token has not been modified (verifying the signature), then it gets the products from JWT payload added previously and add the new one to the list. Finally, it creates a new token with previous and new products and it sent it back to the frontend.
  4. The same process is repeated all the time.


So as you can see, now it is not necessary to maintain any state or add any new database service on backend side, you just need to sent back and forward the JWT token with the products inside.

I have recorded a video of a simple shopping cart example where I show the stateless nature of the solution. It can be seen at:


Also if you want to check the project that I used for recording you can take a look at https://github.com/lordofthejars/shop-jwt.

Notice that this is just a simple post so you can get the basic idea. But you need to take into consideration next things to use it in production:
  1. Use HTTPS instead of HTTP
  2. JWT just signs the token, if you want extra protection apart from HTTPS, use JWE to encrypt the payload of JWT token as well.
  3. Fingerprinting the token to avoid any man-in-the-middle attack and use these parameters as authentication parameters for the token.
  4. JWT can be used for passing authentication and authorization things as well.
You can watch my talk at JavaZone where I introduce some of these techniques:


The good part of JWT approach is that it simplifies a lot the deployment of the service, you don't need to deploy or configure any other distributed database to share the content across the cluster, which minimizes the problems related to the network for communicating to the distributed database or misconfiguring of any of the nodes.

The drawback is that the client needs to be aware to receive and sent back the token and deal with it. In backend side, you need to sign and verify every token all the time.

Note that this approach might work in some cases and might get into some troubles in others (for example if there are parallel connections to backend all of them modifying the token). This post just shows an example of how I implemented this stateless thing in a project with specific requirements, but in other cases it might be wrong to do it. A real shopping cart implementation would have some problems, but for the sake of simplicity and having a business model that everyone undertands, I decided to implement it in this way.

We keep learning,
Alex.
Turn it up, it's your favorite song (hey), Dance, dance, dance to the distortion, Turn it up (turn it up), keep it on repeat, Stumbling around like a wasted zombie (like a wasted zombie) (Chained to the Rhythm - Katy Perry)
Music: https://www.youtube.com/watch?v=Um7pMggPnug

Follow me at https://twitter.com/alexsotob

martes, enero 02, 2018

Writing end to end test for a microservices architecture


UPDATE: I was not really sure if I should call this post with e2e tests since I knew it can get some confusions, but I couldn0t think about any other name. After reading https://martinfowler.com/bliki/IntegrationTest.html I can be sure that what I am describing here is how to do Narrow Integration Test.

One of the main aspects of microservices architecture is that the application is formed as a collection of loosely coupled services each one deployable independently and communicated each other with some kind of light protocol.

It is because of microservices architecture is a distributed system that makes writing end to end tests really hard. Suppose next simple example provided by Red Hat as an example of microservices architecture (https://github.com/jbossdemocentral/coolstore-microservice):


Now suppose that you want to write an end to end test for Cart Service. You will quickly see that it is not easy at all, let me enumerate some of the reasons:

  • Cart Service needs to know how to boot up Pricing Service, Catalog Service, and MongoDB (and if you want to involve the front-end as well then Coolstore GW and WebUI).
  • Cart Service needs to prepare some data (fixtures) for both of external services.
  • You communicate with services using a network. It might occur that some tests fail not because of a real failure but because of an infrastructure problem or because the other services have any bug. So the probability of these tests become flaky and start failing not because any changed introduced in current service is higher.
  • In more complex cases running these tests might be expensive, in terms of cost (deploying to the cloud), time (booting up all the infrastructure and services) and maintenance time.
  • Difficult to run them in developer machine, since you need all the pieces installed on the machine.

For this reason, the end to end tests is not the best approach for testing a microservice, but you still need a way to test from the beginning to the end of the service.

It is necessary to find a way to "simulate" these external dependencies without having to inject any mock object. What we need to do is cheat the service under test so it really thinks it is communicating with the real external services, when in reality it is not.

The method that allows us to do it is Service Virtualiztion.  Service virtualization is a method to emulate the behavior of component applications such as API based.

You can think about service virtualization as mocking approach you used to implement in OOP but instead of simulating at the object level, you simulate at the service level. It is mocking for the enterprise.

There are a lot of service virtualization tools out there, but in my experience, in the JVM ecosystem, one of the tools that work better is Hoverfly.

Let's see how an "end-to-end" test looks like for Cart Service.


This service is implemented using Spring Boot, so we are using Spring Boot Test framework. The important part here is that the URL where Catalog service is deployed is specified by using CATALOG_ENDPOINT property.  And for this test, it is set to catalog.

The next important point is the Hoverfly class rule section. In that rule next things are specified:
  1. An Http proxy is started before the test and all outgoing traffic from JVM is redirected to that proxy.
  2. It records that when a request to host catalog is done and the path is /api/products it must return a success result with given json document.

The test itself just uses TestRestTemplate (it is a rest client) and validates that you can add some elements to the cart.

Notice that you don't need to configure where the Http proxy is started or configure any port because Hoverfly automatically configures JVM network parameters so any network communication goes through Hoverfly proxy.

So notice that now you don't need to know how to boot up Catalog service nor how to configure it with correct data.

You are testing the whole service within its boundaries, from incoming messages to outgoing messages to other services, without mocking any internal element.

Probably you are wondering "What's happening in case of current  service has also a dependency on a database server?"

In this case, you do as usual since the service itself knows which database server is using and the kind of data it requires, you only need to boot up the database server, populate required data (fixtures) and execute tests. For this scenario I suggest you using Arquillian Cube Docker to bootup database service from a Docker container so you don't need to install it on each machine you need to run tests and Arquillian Persistence Extension for maintaining the database into a known state.

In next example of rating service, you can see briefly how to use them for persistence tests:


With this approach, you are ensuring that all inner components of the service work together as expected and avoiding the flakiness nature of end to end tests in microservices.

So end to end tests in any microservice is not exactly the same of an end to end test in a monolith application, you are still testing the whole service, but just keeping a controlled environment, where test only depends on components within the boundary of service.

How contract tests fit on this? Well actually everything showed here can be used in consumer and provider side of contract testing to avoid having to boot up any external service.  In this way, as many authors conclude, if you are using contract tests, these are becoming the new end to end tests.

viernes, diciembre 29, 2017

Java Champion


Before Christmas, I received the good news that I become a Java Champion. And then many memories came to my mind. My first computer, the ZX Spectrum that my parents bought me when I was 6, the first game I had, Desperado (http://www.worldofspectrum.org/infoseekid.cgi?id=0009331)  from TopoSoft. All programs that I copied from books in Basic language, all modifications I did and of course all the "pokers" that I copied from magazines to have infinite lives in games.

After that, it started the PC era, where I remember creating many "bat" files for having different memory configurations for playing games, editing saved files with Hex editors to have millions of resources and the appearance of Turbo C in my computer.

Finally, the internet era, that for me started in 1997, and my first browser which it was Netscape. What good old time, and then my first web page and JavaScript.

And this moves me towards the key point, I think it was at 1999 or 2000, I bought a magazine which it came with a CD-ROM with Java 1.2 there, I installed and I started programming in Java without IDE until today.

Probably this is the life of many of developers that were born in the 80s. 

But this is only "scientific" facts, not feelings. These days I have been thinking about the feelings I had, what ruled to me all this time, and it came to my mind the opening theme of one of my favorite TV program called "This is Opera". Exactly the same words can be applied in my case for programming/computing/Java.


I cannot finish without thanking all the people who I met over the globe during conferences, starting with Dan Allen (the first one I met at a conference), all Arquillian team, Tomitribe team with David Belvins at head), Asciidoctor community, Barcelona JUG guys and a lot of people, organizers, attendees, .... every one thank you so much for being there.

Of course, all the workmates I had in University (La Salle), in Aventia, Grifols (thanks to Erytra team, I enjoyed so much during all years I was there), Everis, Scytl, CloudBees (LLAP to Jenkins) and finally Red Hat, a company that I really love and I feel like home.

Last but not least my family who has been there all the time.

Next year I will continue posting more posts, contributing more to open source projects and of course going to speak to as many events as possible.

We keep learning,
Alex.
Caminante son tus huellas el camino y nada más: caminante, no hay camino se hace el camino al andar (Caminante No Hay Camino - Joan Manuel Serrat)


miércoles, octubre 25, 2017

Adding Chaos on OpenShift cluster


Pumba is a chaos testing tool for Docker and Kubernetes (hence OpenShift too). It allows you to add some chaos on containers instances such as stopping, killing or removing containers randomly. But it also adding some network chaos such as delaying, packet loss or re-ordering.

You can see in next screen recording how to add Pumba on OpenShift cluster and add some chaos on it.


The security calls that you need to run before deploying Pumba are the next ones:

Also the Kubernetes script to deploy Pumba in OpenShift is:


I have sent a PR to upstream Pumba project with this file but meanwhile is not accepted you can use it this one.

I'd like to say thank you to Slava Semushin and Jorge Morales for helping me on understanding the OpenShift security model.

We keep learning,
Alex.
Ce joli rajolinet, que les oques tonifique, si le fique en une pique, mantindra le pompis net (El baró de Bidet - La Trinca)
Music: https://www.youtube.com/watch?v=4JWIbKGe4gA

Follow me at https://twitter.com/alexsotob


martes, octubre 24, 2017

Testing Code that requires a mail server

Almost all applications has one common requirement, they need to send an email notifying something to a registered user. It might be an invoice, a confirmation of an action or a password recovery. How to test this use case might be challenging, using mocks and stubs are ok for unit tests, but having a component test that tests the whole stack. 

In this post I am going to show you how Docker and MailHog, can help you on testing this part of code.

MailHog is  super simple SMTP server for email testing tool for developers:
  • Configure your application to use MailHog for SMTP delivery
  • View messages in the web UI, or retrieve them with the JSON API
  • Optionally release messages to real SMTP servers for delivery
  • Docker image with MailHog installed
Notice that since you can retrieve any message sent to mail server using JSON API, it makes really simple to validate if the message has been really delivered and of course assert on any of message fields.

Arquillian Cube is an Arquillian extension that can be used to manager Docker containers in your tests. To use it you need a Docker daemon running on a computer (it can be local or not), but probably it will be at local.

Arquillian Cube offers three different ways to define container(s):
  • Defining a docker-compose file.
  • Defining a Container Object.
  • Using Container Object DSL.
In this example I am going to show you Container Object DSL approach, but any of the others works as well.

To use Container Object DSL you simply need to instantiate the ContainerDslRule (in case you are using JUnit Rules) or use Arquillian runner in case of using JUnit, TestNG or Spock. You can read more about Container Object DSL at http://arquillian.org/arquillian-cube/#_arquillian_cube_and_container_object_dsl

As an example of definition of Redis container:


When running this test, Redis Docker image is started, tests are executed and finally the Docker instance is stopped.

So let's see how to do the same but instead of Redis using Mailhog Docker image.
It is important to notice that ContainerDslRule is a generic class that  can be extended to become more specific to a concrete use case. And this is what we are going to do for Mailhog.

First of all we need to create a class extending from ContainerDslRule, so everything is still a JUnit rule, but a customized one. Then we create a factory method which creates the MailhogContainer object, setting the image name and the binding ports. Finally an assertion method is used to connect to Rest API of Mailhog server to check if there is any message with given subject.

Then we can write a test using this new rule.


This test just configures MailService class with Docker container configuration, it sends an email and finally it delegates to container object to validate if the email has been received or not.

Notice that putting everything into an object makes this object reusable in other tests and even in other projects. You can create an independent project with all your custom developed container objects and just reuse them importing them as test jar in hosted project.

Code: https://github.com/lordofthejars/mailtest

We keep learning,
Alex.
'Cause I'm kind of like Han Solo always stroking my own wookie, I'm the root of all that's evil yeah but you can call me cookie (Fire Water Burn - Bloodhound Gang)


martes, septiembre 19, 2017

Testing code that uses Java System Properties

Sometimes your code uses any Java System Property to configure itself. Usually these classes are configuration classes that can get properties from different sources and one of valid one is using Java System Properties.

The problem is how to write tests for this code? Obviously to maintain your tests isolated you need to set and unset them for each test, restoring old value if for example you are dealing with a global property which is already set before executing tests, and of course in case of an error do not forget to unset/restore the value. So arrived at this point the test might look like:

Notice that this structure should be repeated for each test method that requires an specific system property, so this structure becomes a boilerplate code.

To avoid having to repeat this code over and over again, you can use System Rules project which is a collection of JUnit rules for testing code that uses java.lang.System 

The first thing you need to do is add System Rules dependency as test scope in your build tool, which in this case is com.github.stefanbirkner:system-rules:1.16.0.

Then you need to register the JUnit Rule into your test class.

In this case, you can freely set a System property in your test, the JUnit rule will take care of saving and restoring the System property.

That's it, really easy, no boilerplate code and help you maintaining your tests clean.

Just one notice, these kind of tests are not thread safe, so you need to be really cautious when you use for example surefire plugin with forks. One possible way to avoiding this is by using net.jcip.annotations.NotThreadSafe.class capabilities.

We keep learning,
Alex

Polly wants a cracker, I think I should get off her first, I think she wants some water, To put out the blow torch (Polly - Nirvana)


martes, junio 27, 2017

Lifecycle of JUnit 5 Extension Model


JUnit5 final release is around the corner (currently it is M4), and I have started playing with it a bit on how to write extensions.

In JUnit5, instead of dealing with Runners, Rules, ClassRules and so on, you've got a single Extension API to implement your own extensions.

JUnit5 provides several interfaces to hook in its lifecycle. For example you can hook to Test Instance Post-processing to invoke custom initialization methods on the test instance, or Parameter Resolution for dynamically resolving test method parameters at runtime. And of course the typical ones like hooking before all tests are executed, before a test is executed, after a test is executed and so on so far, a complete list can be found at http://junit.org/junit5/docs/current/user-guide/#extensions-lifecycle-callbacks

But in which point of the process it is executed each of them? To test it I have just created an extension that implements all interfaces and each method prints who is it.


Then I have created a JUnit5 Test suite containing two tests:

So after executing this suite, what it is the output? Let's see it. Notice that for sake of readability I have added some callouts on terminal output.


<1> First test that it is run is AnotherLoggerExtensionTest. In this case there is only one simple test, so the lifecycle of extension is BeforeAll, Test Instance-Post-Processing, Before Each, Before Test Execution, then the test itself is executed, and then all After callbacks.

<2> Then the LoggerExtensionTest is executed. First test is not a parametrized test, so events related to parameter resolution are not called. Before the test method is executed, test instance post-processing is called, and after that all before events are thrown. Finally the test is executed with all after events.

<3> Second test contains requires a parameter resolution. Parameter resolvers are run after Before events and before executing the test itself.

<4> Last test throws an exception. Test Execution Exception is called after test is executed but before After events.

Last thing to notice is that BeforeAll and AfterAll events are executed per test class and not suite.

The JUnit version used in this example is org.junit.jupiter:junit-jupiter-api:5.0.0-M4

We keep learning,
Alex
That's why we won't back down, We won't run and hide, 'Cause these are the things we can't deny, I'm passing over you like a satellite (Satellite - Rise Against)
Music: https://www.youtube.com/watch?v=6nQCxwneUwA

Follow me at

viernes, junio 23, 2017

Test AWS cloud stack offline with Arquillian and LocalStack


When you are building your applications on AWS cloud stack (such as DynamoDB, S3, ...), you need to write tests against these components. The first idea you might have is to have one environment for production and another one for testing, and run tests against it.

This is fine for integration tests, deployment tests, end to end tests or performance tests, but for component tests it will be faster if you could run AWS cloud stack locally and offline.

Localstack provides this feature. It  provides a fully functional local AWS cloud stack so you can develop and test your cloud applications offline.

Localstack comes with different ways to start all stack, but the easiest one is by using Docker image. So if you run atlassianlabs/localstack then you get the stack up and running with next configuration:
  • API Gateway at http://localhost:4567
  • Kinesis at http://localhost:4568
  • DynamoDB at http://localhost:4569
  • DynamoDB Streams at http://localhost:4570
  • Elasticsearch at http://localhost:4571
  • S3 at http://localhost:4572
  • Firehose at http://localhost:4573
  • Lambda at http://localhost:4574
  • SNS at http://localhost:4575
  • SQS at http://localhost:4576
  • Redshift at http://localhost:4577
  • ES (Elasticsearch Service) at http://localhost:4578
  • SES at http://localhost:4579
  • Route53 at http://localhost:4580
  • CloudFormation at http://localhost:4581
  • CloudWatch at http://localhost:4582
So the next question is how do you automate all the process of starting the container, run the tests and finally stop everything and make it portable, so you don't need to worry if you are using Docker in Linux or MacOS? The answer is using Arquillian Cube.

Arquillian Cube is an Arquillian extension that can be used to manager Docker containers in your tests. To use it you need a Docker daemon running on a computer (it can be local or not), but probably it will be at local.

Arquillian Cube offers three different ways to define container(s):
  • Defining a docker-compose file.
  • Defining a Container Object.
  • Using Container Object DSL.
In this example I am going to show you Container Object DSL approach, but any of the others works as well.

The first thing you need to do is add Arquillian and Arquillian Cube dependencies on your build tool.


Then you can write the test which in this case tests that you can create a bucket and add some content using the S3 instance started in Docker host:

Important things to take into consideration:
  1. You annotate your test with Arquillian runner.
  2. Use @DockerContainer annotation to attribute used to define the container.
  3. Container Object DSL is just a DSL that allows you to configure the container you want to use. In this case the localstack container with required port binding information.
  4. The test just connects to Amazon S3 and creates a bucket and stores some content.
Nothing else is required. When you run this test, Arquillian Cube will connect to installed Docker (Machine) host and start the localstack container. When it is up and running and services are able to receive requests, the tests are executed. After that container is stopped and destroyed.

TIP1: If you cannot use Arquillian runner you can also use a JUnit Class Rule to define the container as described here http://arquillian.org/arquillian-cube/#_junit_rule

TIP2: If you are planning to use localstack in the whole organization, I suggest you to use Container Object approach instead of DSL because then you can pack the localstack Container Object into a jar file and import in all projects you need to use it. You can read at http://arquillian.org/arquillian-cube/#_arquillian_cube_and_container_object

So now you can write tests for your application running on AWS cloud without having to connect to remote hosts, just using local environment.

We keep learning,
Alex
Tú, tú eres el imán y yo soy el metal , Me voy acercando y voy armando el plan , Solo con pensarlo se acelera el pulso (Oh yeah) (Despacito - Luis Fonsi)
Music: https://www.youtube.com/watch?v=kJQP7kiw5Fk


jueves, junio 22, 2017

Vert.X meets Service Virtualization with Hoverfly


Service Virtualization is a technique using to emulate the behaviour of dependencies of component-based applications.

Hoverfly is a service virtualisation tool written in Go which allows you to emulate HTTP(S) services. It is a proxy which responds to HTTP(S) requests with stored responses, pretending to be it’s real counterpart.

Hoverfly Java is a wrapper around Hoverfly, that let's you use it in Java world. It provides a native Java DSL to write expectations and a JUnit rule to use it together with JUnit.

But apart from being able to program expectations, you can also use Hoverfly to capture traffic between both services (in both cases are real services) and persist it.

Then in next runs Hoverfly will use these persisted scripts to emulate traffic and not touch the remote service. In this way, instead of programming expectations, which means that you are programming how you understand the system, you are using real communication data.

This can be summarised in next figures:


First time the output traffic is sent though Hoverfly proxy, it is redirected to real service and it generates a response. Then when the response arrives to proxy, both request and response are stored, and the real response is sent back to caller.

Then in next calls of same method:


The output traffic of Service A is still sent though Hoverfly proxy, but now the response is returned from previous stored responses instead of redirecting to real service.

So, how to connect from HTTP client of Service A to Hoverfly proxy? The quick answer is nothing.

Hoverfly just overrides Java network system properties (https://docs.oracle.com/javase/7/docs/api/java/net/doc-files/net-properties.html) so you don't need to do anything, all communications (independently of the host you put there) from HTTP client will  go through Hoverfly proxy.

The problem is what's happening if the API you are using as HTTP client does not honor these system properties? Then obviously all outgoing communications will not pass thorough proxy.

One example is Vert.X and its HTTP client io.vertx.rxjava.ext.web.client.WebClient. Since WebClient does not honor these properties, you need to configure the client properly in order to use Hoverfly.

The basic step you need to do is just configure WebClient with proxy options that are set as system properties.

Notice that the only thing that it done here is just checking if system properties regarding network proxy has been configured (by Hoverfly Java) and if it is the case just create a Vert.X ProxyOptions object to configure the HTTP client.

With this change, you can write tests with Hoverfly and Vert.X without any problem:

In previous example Hoverfly is used as in simulate mode and the request/response definitions comes in form of DSL instead of an external JSON script.
Notice that in this case you are programming that when a request by current service (VillainsVerticle), is done to host crimes and port 9090, using GET HTTP method at /crimes/Gru then the response is returned. For sake of simplicity of current post this method is enough.

You can see source code at https://github.com/arquillian-testing-microservices/villains-service and read about Hoverfly Java at http://hoverfly-java.readthedocs.io/en/latest/

We keep learning,
Alex
No vull veure't, vull mirar-te. No vull imaginar-te, vull sentir-te. Vull compartir tot això que sents. No vull tenir-te a tu: vull, amb tu, tenir el temps. (Una LLuna a l'Aigua - Txarango)
Music: https://www.youtube.com/watch?v=BeH2eH9iPw4

miércoles, mayo 24, 2017

Deploying Docker Images to OpenShift


OpenShift is RedHat's cloud development Platform as a Service (PaaS). It uses Kubernetes as container orchestration (so you can use OpenShift as Kubernetes implementation), but providing some features missed in Kubernates such as automation of the build process of the containers, health management, dynamic provision storage or multi-tenancy to cite a few.

In this post I am going to explain how you can deploy a Docker image from Docker Hub into an OpenShift instance. 

It is important to note that OpenShift offers other ways to create and deploy a container into its infrastructure, you can read more about at https://docs.openshift.com/enterprise/3.2/dev_guide/builds.html but as read in previous paragraph, in this case I am going to show you how to deploy already created Docker images from Docker Hub.

First thing to do is create an account in OpenShift Online. It is free and for the sake of this post is enough. Of course you can use any other OpenShift approach like OpenShift Origin.

After that you need to login into OpenShift cluster. In case of OpenShift Online using the token provided:

oc login https://api.starter-us-east-1.openshift.com --token=xxxxxxx

Then you need to create a new project inside OpenShift.

oc new-project villains

You can understand a project as a Kubernetes namespace with additional features. 

Then let's create a new application within previous project based on a Docker image published at Docker Hub. This example is a VertX application where you can get crimes from several fictional villains from Lex Luthor to Gru.

oc new-app lordofthejars/crimes:1.0 --name crimes

In this case a new app called crimes is created based on lordofthejars/crimes:1.0 image. After running previous command, a new pod running previous image + a service +  a replication controller is created.

After that we need to create a route so the service is available to public internet.

oc expose svc crimes --name=crimeswelcome

The last step is just get the version of the service from the browser, in my case was: http://crimeswelcome-villains.1d35.starter-us-east-1.openshiftapps.com/version notice that you need to change the public host with the one generated by your router and then append version. You can find the public URL by going to OpenShift dashboard, at top of pods definition.


Ok now you'll get a 1.0 which is the version we have deployed. Now suppose you want to update to next version of the service, to version 1.1, so you need to run next commands to deploy next version of crimes service container, which is pushed at Docker Hub.

oc import-image crimes:1.1 --from=lordofthejars/crimes:1.1

With previous command you are configuring internal OpenShift Docker Registry with next Docker image to release.

Then let's prepare the application so when next rollout command is applied, the new image is deployed:

oc patch dc/crimes -p '{"spec": { "triggers":[ {"type": "ConfigChange", "type": "ImageChange" , "imageChangeParams": {"automatic": true, "containerNames":["crimes"],"from": {"name":"crimes:1.1"}}}]}}'

And finally you can do the rollout of the application by using:

oc rollout latest dc/crimes

After a few seconds you can go again to http://crimeswelcome-villains.1d35.starter-us-east-1.openshiftapps.com/version (of course change the host with your host) and the version you'll get is 1.1.

Finally what's happening if this new version contains a bug, and you want to do a rollback of the deployment to previous version? Easy just run next command:

oc rollback crimes-1

And previous version is going to be deployed again, so after a few seconds you can go again to /version and you'll see 1.0 version again.

Finally if you want to delete the application to have a clean cluster run:

oc delete all --all

So as you can see, it is really easy to deploy to deploy container images from Docker Hub to OpenShift. Notice that there are other ways to deploy our application into OpenShift (https://docs.openshift.com/enterprise/3.2/dev_guide/builds.html), in this post I have just shown you one.

Commands: https://gist.github.com/lordofthejars/9fb5f08e47775a185a9b1f80f4af7aff

We keep learning,
Alex.
Yo listen up here's a story, About a little guy that lives in a blue world, And all day and all night and, everything he sees is just blue, Like him inside and outside (Blue - Eiffel 65)
Music: https://www.youtube.com/watch?v=68ugkg9RePc